Are you confident that your Google Workspace files are shared with the right people and under the right conditions? In today’s interconnected world, sharing documents and files online has become second nature. However, with the convenience of cloud-based platforms like Google Workspace comes a significant risk: accidental exposure of sensitive information. A single misstep in link sharing permissions can have far-reaching consequences, from minor inconveniences to major security breaches.
What are link sharing permissions?
Link sharing permissions in Google Workspace determine who can access your files and what they can do with them. When you share a file, you can choose from various permissions, such as:
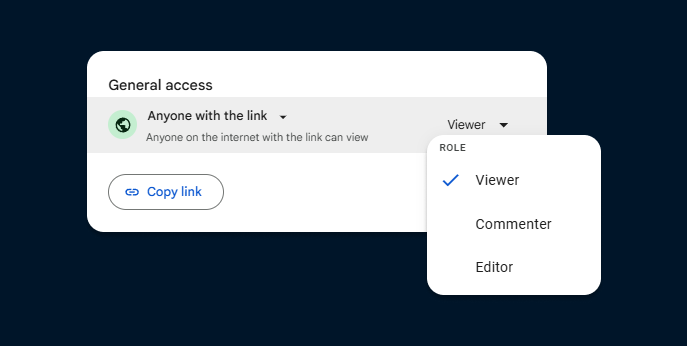
Viewer: Can only view the file.
Commenter: Can view and comment on the file.
Editor: Can view, comment, and edit the file.
Owner: Has full control over the file, including sharing it with others.
Why are Link Sharing Permissions Important?
Managing link sharing permissions properly is super important for keeping your organization’s data safe. Here are some key benefits:
Better Security: By controlling who can access your files, you reduce the risk of unauthorized access and data breaches.
Smoother Collaboration: Proper link sharing settings ensure that only the right people can view and edit documents, making teamwork easier and more efficient.
Data Accuracy: When you manage permissions correctly, you can prevent accidental changes or deletions, keeping your data accurate and reliable.
Compliance: Many industries have strict data protection rules. Proper link sharing management helps you stay compliant with these regulations, avoiding potential fines and legal issues.
Peace of Mind: Knowing that your files are shared safely gives you confidence and peace of mind, allowing you to focus on your work without worrying about data security.
How to Modify Link Sharing Permissions in Google Workspace?
This section will delve into the practical steps of configuring link sharing permissions. To effectively manage link sharing permissions within your Google Workspace organization, you’ll need to access the Google Admin console. To start setting up your link sharing permissions follow the steps below:
1. Log in to your Google Admin console: Go to admin.google.com and use your administrator credentials
2. Navigate to Sharing Settings:
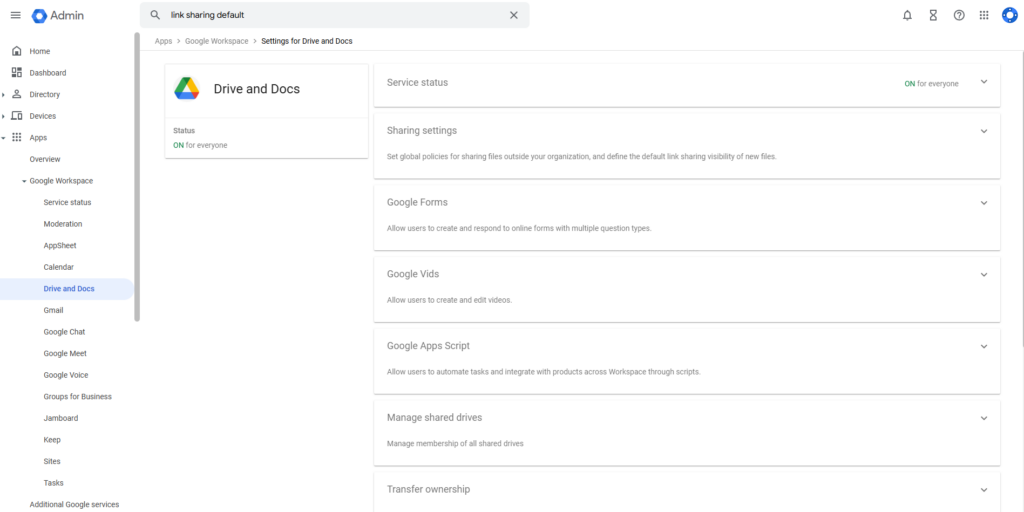
Go to Apps > Google Workspace.
Select Drive and Docs.
Click Sharing settings.
3. Modify your external link sharing:
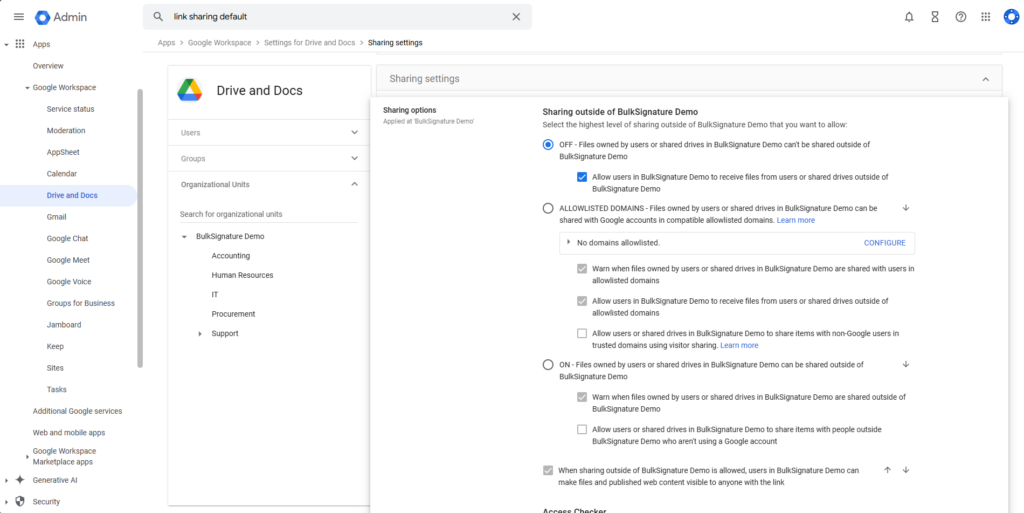
To prevent users from sharing files with people outside the organization, navigate to Sharing options and TURN OFF Sharing outside of your organization.
If you need to allow external sharing, consider using allowlisted domains to limit access to specific individuals or groups.
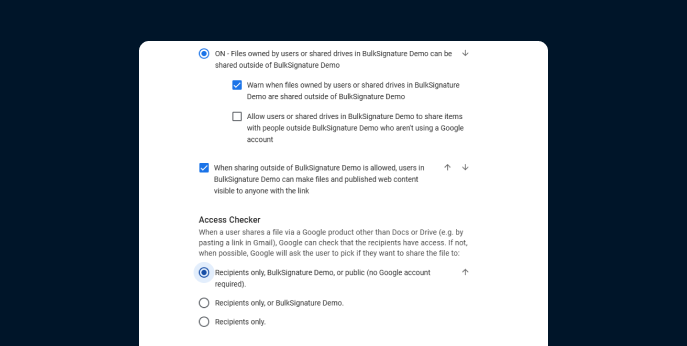
You can also review and disable the additional warning checkboxes, e.g: Warn when files owned by users or shared drives in Your Organization are shared outside of Your Organization
4. Prevent accidental oversharing: manage your access checker options
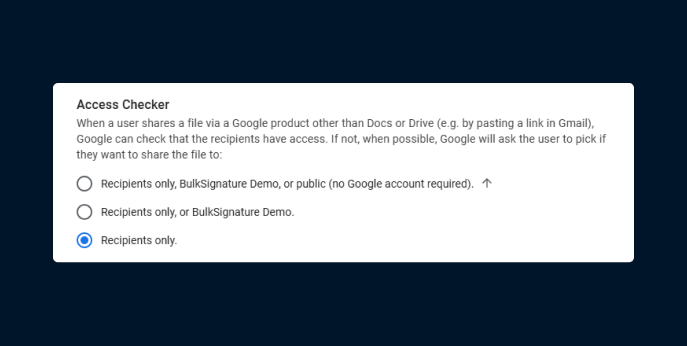
To make your files available without additional prompts before sending them you can Select Recipients only, your organization, or public (no Google account required).
To limit the files access to recipients only or your organization, you can select
Recipients only, or BulkSignature Demo.
You can also set your access checker to make your files available to your Recipients only.
5. Manage content distribution outside your organization
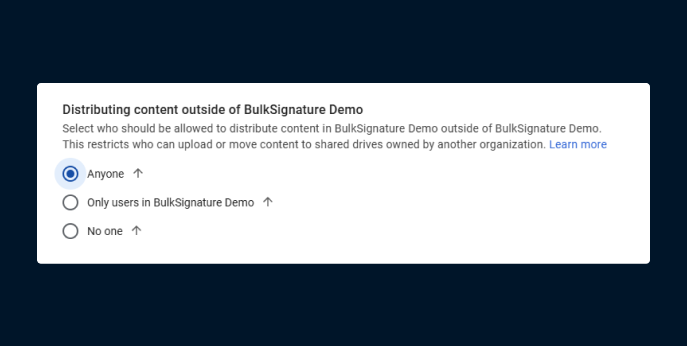
Select Anyone if you want to allow any user to move content from a shared drive in your organization to an external shared drive.
You can block moving content from a user’s My Drive in your organization to an external shared drive by choosing Your Organization or No one.
How to Restrict All File Sharing Outside of Your Organization
Restricting file sharing outside your organization is really important for keeping sensitive information safe. This way you will stay compliant with industry regulations, maintaining control over document access. Moreover, you will be able to reduce risks like phishing and malware, improving collaboration consistency. All these steps you will protect your organization’s reputation. Follow the steps below to learn how to set up your organization:
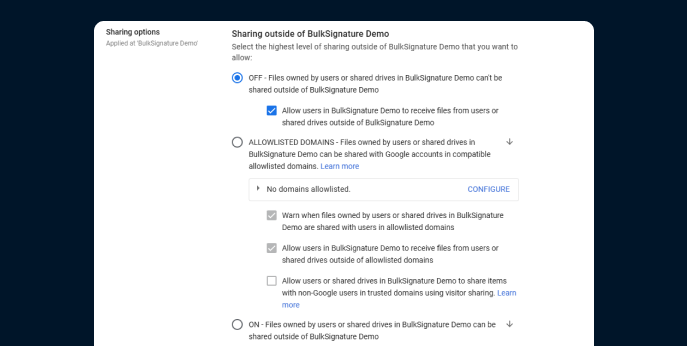
Access the Admin Console: Log in to your Google Admin console.
Navigate to Sharing Settings: Go to Apps > Google Workspace > Drive and Docs > Sharing settings.
Disable External Sharing:
Go to Sharing options
Locate Sharing outside of your organization
Set it to OFF – Files owned by users or shared drives in BulkSignature Demo can’t be shared outside of BulkSignature Demo
Enforce Strict Access Controls: Optionally you can consider using allowlisted domains to limit access to sensitive files.
Monitor User Activity: Regularly monitor user activity to identify any potential security risks.
How to Enable Selective File Sharing for External Users
When working with external partners, it’s important to balance collaboration and security. Set clear permissions so only necessary files are shared. In order to do that you need to use expiration dates for shared links, enable two-factor authentication, regularly review access. Additionally, you need to educate your team on best practices and use secure sharing tools. These steps help you collaborate effectively while keeping sensitive information protected.
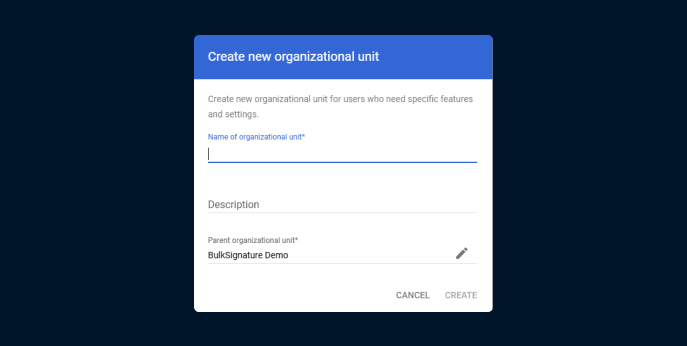
Create a Dedicated Organizational Unit: Create a separate organizational unit for external collaborators.
Go to Directory > Organizational Units
Click Create organizational unit
Go to Directory > Users
Select the external users and click More options
Click Change organizational unit
Select the created organizational unit
Set Restrictive Sharing Permissions: Apply strict sharing permissions to the external organizational unit.
Go to Apps > Google Workspace > Drive and Docs
Click Sharing options
Locate Sharing outside your organization and set it to OFF.
Use Target Audiences: Optionally you can consider using allowlisted domains to limit access to sensitive files.
Implement Data Loss Prevention (DLP) Policies: Use DLP policies to identify and protect sensitive information.
How to Allow Users to Share Files Externally
You may also want your team to collaborate with external clients on specific projects while keeping everything secure. In order to do that you need to set up shared drives, use specific permissions, enable link sharing with restrictions, set expiration dates, monitor activity, and educate your team on best practices. Let’s find out below how you allow your users to share files externally.
Access the Admin Console: Log in to your Google Admin console.
Navigate to Sharing Settings: Go to Apps > Google Workspace > Drive and Docs > Sharing settings.
Enable External Sharing: Under Sharing options, turn on Sharing outside of your organization.
Set Default Sharing Permissions: Consider setting a default sharing level, such as Anyone with the link, to simplify the process for your users.
Implement Access Checker: Enable Access Checker to ensure that users choose the appropriate sharing level when sharing files externally.
6 Best Practices for Managing Link Sharing Permissions
Managing link sharing permissions well is crucial for keeping your organization’s data safe and sound. Here are some best practices to help you share files securely and appropriately:
Regularly Check Permissions
Make it a habit to regularly check who has access to your files and folders. This helps ensure that only the right people can see or edit your documents. Regular checks can prevent unauthorized access and help you stay on top of who has permissions.
Use Google Workspace’s activity logs to see who is viewing and editing your files. This can help spot any unusual activity. By monitoring these logs, you can quickly identify and address any potential security issues.
Use Target Audiences
Create groups or organizational units within your organization to make sharing easier and safer. This way, you can share files with specific teams or departments without worrying about them reaching the wrong people. Grouping users helps streamline the sharing process and ensures that files are shared with the right audience.
Apply rules to these groups to control who can share what, ensuring everyone has the right level of access. Setting up these rules helps maintain order and security within your organization.
Educate Your Team
Hold regular training sessions to teach your team about secure file sharing and how to set permissions correctly. These sessions can help your team understand the importance of data security and how to manage permissions effectively.
Provide easy-to-follow guidelines and resources to help your team understand the best practices for managing link sharing. Clear instructions can empower your team to share files securely and confidently.
Follow the Least Privilege Principle
Give users the least amount of access they need to do their jobs. This reduces the risk of sensitive information being shared by mistake. By limiting access, you can better protect your organization’s data.
For short-term projects, give temporary access and make sure to remove it once the project is done. This ensures that access is only granted when necessary and is revoked when no longer needed.
Use Google Workspace Features
Use expiration dates for shared links so that access is automatically removed after a certain time. This feature helps you control how long someone can access your files, adding an extra layer of security.
Use viewer and commenter roles instead of editor roles whenever possible to limit who can make changes to your documents. By restricting editing capabilities, you can prevent unauthorized changes to your files.
Update Sharing Policies Regularly
Regularly review and update your sharing policies to keep up with new security challenges and changes in your workflow. Keeping your policies up-to-date ensures they remain effective and relevant.
Ask your team for feedback on the sharing policies to find areas for improvement and ensure the policies are practical and effective. Engaging your team in the policy-making process can lead to better compliance and more effective policies.
Advanced Tips and Tricks for User Management
on Google Workspace
Set Up Auto Replies for Departing Employees: Ensure that when an employee leaves, their email account is set up with an auto-reply. This informs senders that the person is no longer with the company and provides an alternative contact. This helps maintain communication flow and security.
Automate Email Signature Campaigns: Use tools like BulkSignature to automate email signature campaigns. This allows you to update and deploy promotional banners or messages across all employee signatures without manual intervention, ensuring consistency and saving time.
Email Signature Template Automation: Streamline the creation and deployment of email signature templates. Automating this process ensures that all employees have up-to-date and professional signatures, reflecting your brand consistently.
Customize Application Access on Google Admin Console: Use the Google Admin Console to customize application access for different user groups. This allows you to control who can access specific apps and data, enhancing security and ensuring that only authorized personnel have access to sensitive information.
Regularly Review and Update Permissions: Periodically review and update link sharing permissions to ensure they align with your current security policies and organizational needs. This helps prevent unauthorized access and keeps your data secure.
Educate Your Team: Continuously educate your team about the importance of proper link sharing management and the tools available to them. Providing regular training sessions and resources can help them stay informed and follow best practices.

