Creating an email group in Google Workspace allows you to take your team collaboration to the next level and expand your communication abilities. You may not see it at first but the sooner you realize you need it the better.
What you can find in the article:
✔️ What is an Email Group on Google Workspace
✔️ Why you Need to Create an Email Group in Google Workspace
✔️ How to Set up an Email Group in Google Workspace
✔️ How to Adjust Email Groups’ Settings to your Needs
In this how-to guide, you’ll learn about creating group emails in Google Workspace. After accomplishing all the steps and setting all up, you’ll improve your teams’ communication, performance, and productivity.
What is an Email Group on Google Workspace?
Email groups in Google Workspace make it easy to send one email to multiple people at once. It’s a simple way to communicate and collaborate with teams or departments by allowing individuals to join a group and receive messages sent to that group’s email address.
This way you can create separate groups for the different departments in your organization and alleviate internal engagement. You can even set names for each department to have something like: marketing@yourcompany.com; finance@yourcompany.com; etc.
Prerequisites for Creating an Email Group in Google Workspace Admin
Before you can create an email group in Google Workspace Admin, you will need to have the following:
- A Google Workspace account: You must have a Google Workspace account in order to create and manage email groups.
- Administrator privileges: You must be an administrator in your Google Workspace account in order to create and manage email groups.
- A domain name: You must have a domain name associated with your Google Workspace account. This domain name will be used to create the email group’s address.
Once you have these prerequisites in place, you can follow the steps in the rest of this article to create an email group.
Why You Need to Create an Email Group in Google Workspace
There are numerous reasons why you may want to create groups on Google Workspace. Here are the three main reasons:
Save time by sending group emails (one address for multiple users).
Enable quick communication with your teams.
Organize events conveniently within seconds.
Empower collaboration between your teams and departments.
Share content with multiple users in your organization within a moment.
No need to worry about growing your organization and rotating positions.
How to Set up an Email Group in Google Workspace
To set up Group Emails you need to go through the main steps of the installation process. Below we’ll go through each step in detail so that you could easily set it all up without any need for special knowledge.
Creating a group inbox
To create a group inbox, which is also known as a collaborative inbox, you need to make sure that you have required admin privilege enabled. When you have all the requirement you can proceed with the following steps:
Your account must have admin privileges so that you could access admin.google.com
To get to admin.google.com you can either go to the website or you can access it from your Gmail inbox (make sure you are using the right account). To access admin.google.com from your inbox you need to do the following:
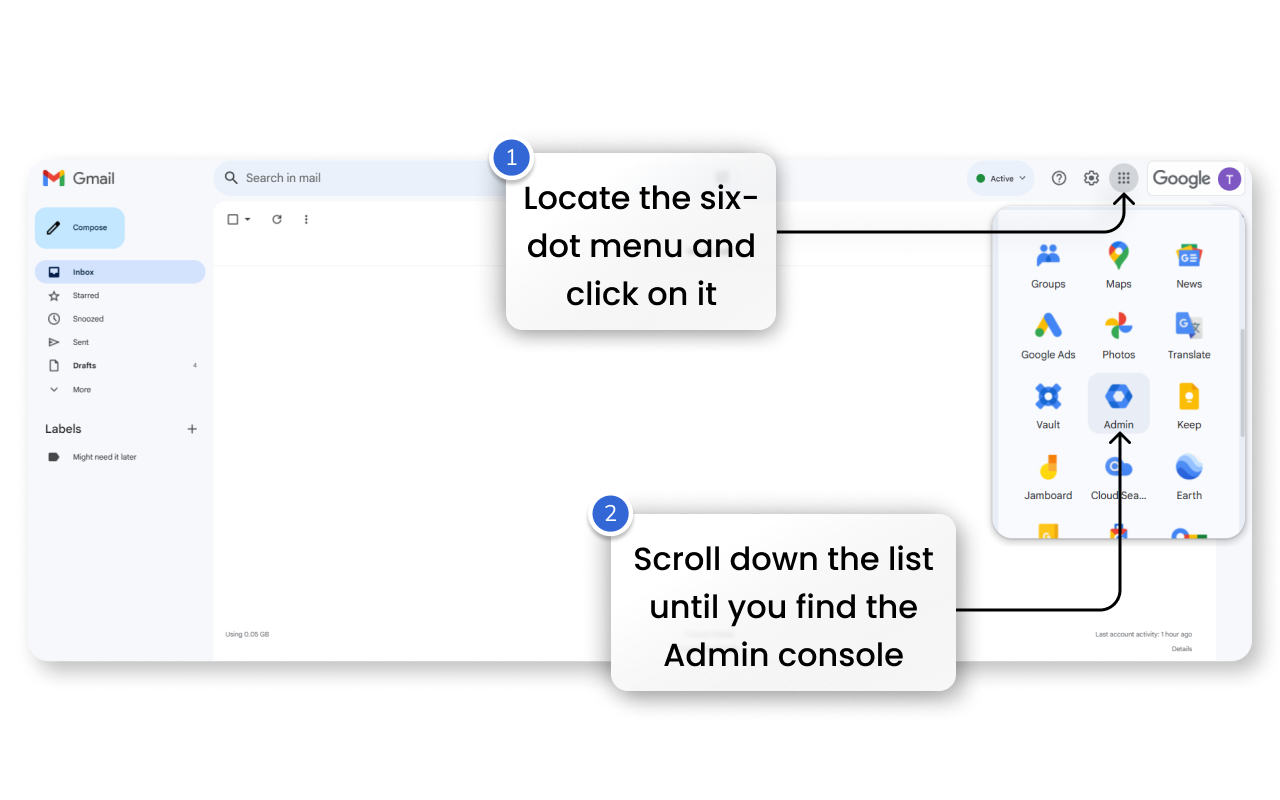
— Open your Gmail inbox
— Hit the six-dot button in the upper-right corner of the page, and it’ll open your Google Apps
— Scroll all the way down until you find ‘Admin’ that has an icon of a blue hexagon
— Click on it and you’re in
If you don’t have admin privileges, you need to request other admins in your organization to assign you an admin role. You cannot do it yourself since this procedure is performed from within the Google Admin console.
Once you’re in the Google Admin console, you need to follow the steps below:
Open the side menu
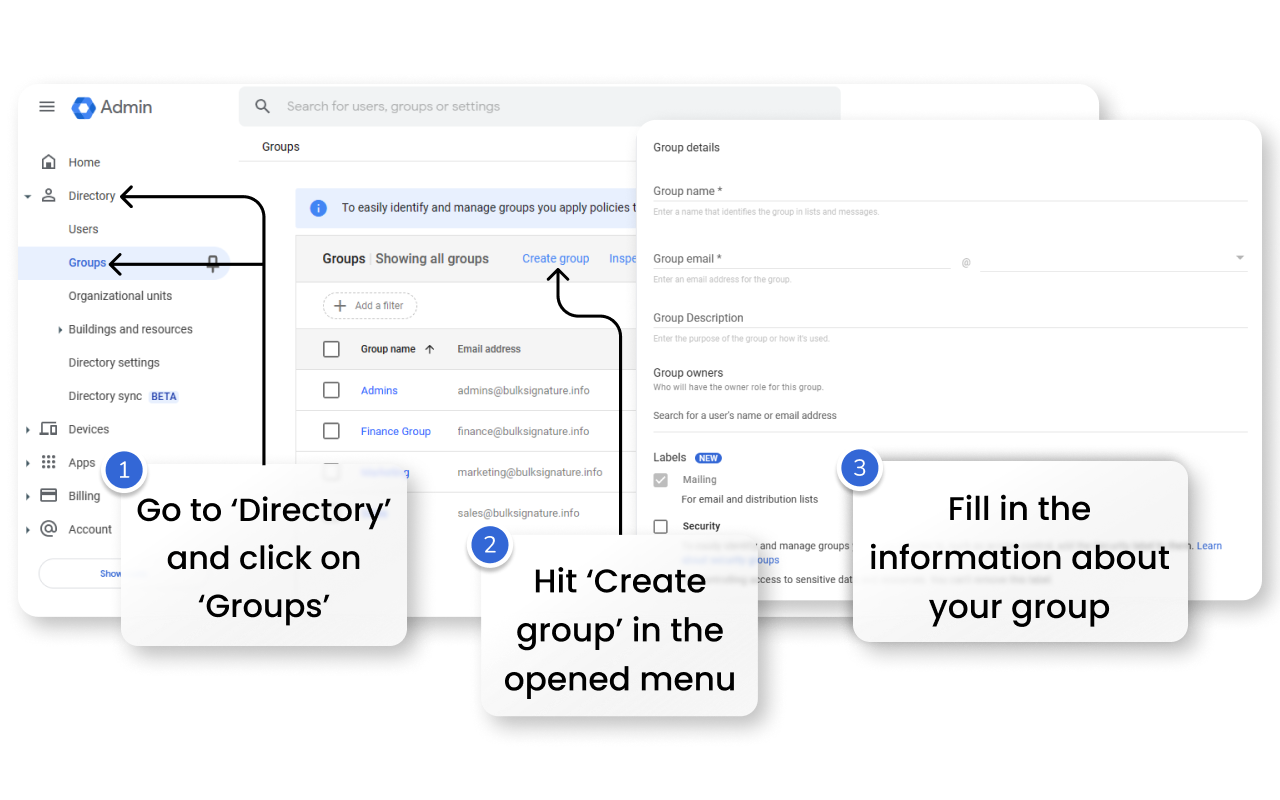
Locate and click on ‘Directory’
Select ‘Groups’
Hit ‘Create Groups’
Fill in the details: ‘Group name’, ‘Group email’, ‘Group Owner’, etc. (NOTE: Your ‘Group email’ should be similar to your ‘Group name’)
This way you can create a group email for a marketing department or support team. The inbox can be used for third-party partnership communication, internal strategy discussions, and more.
Before applying the changes review the following points:
You don’t have mistakes in your domain
You carefully selected the group owners (NOTE: They will be responsible for group settings)
Click ‘Next’ after checking all the points
Adjusting your Email Group Settings
After creating your group, you can now move on to the settings adjustment process. To do that you need to:
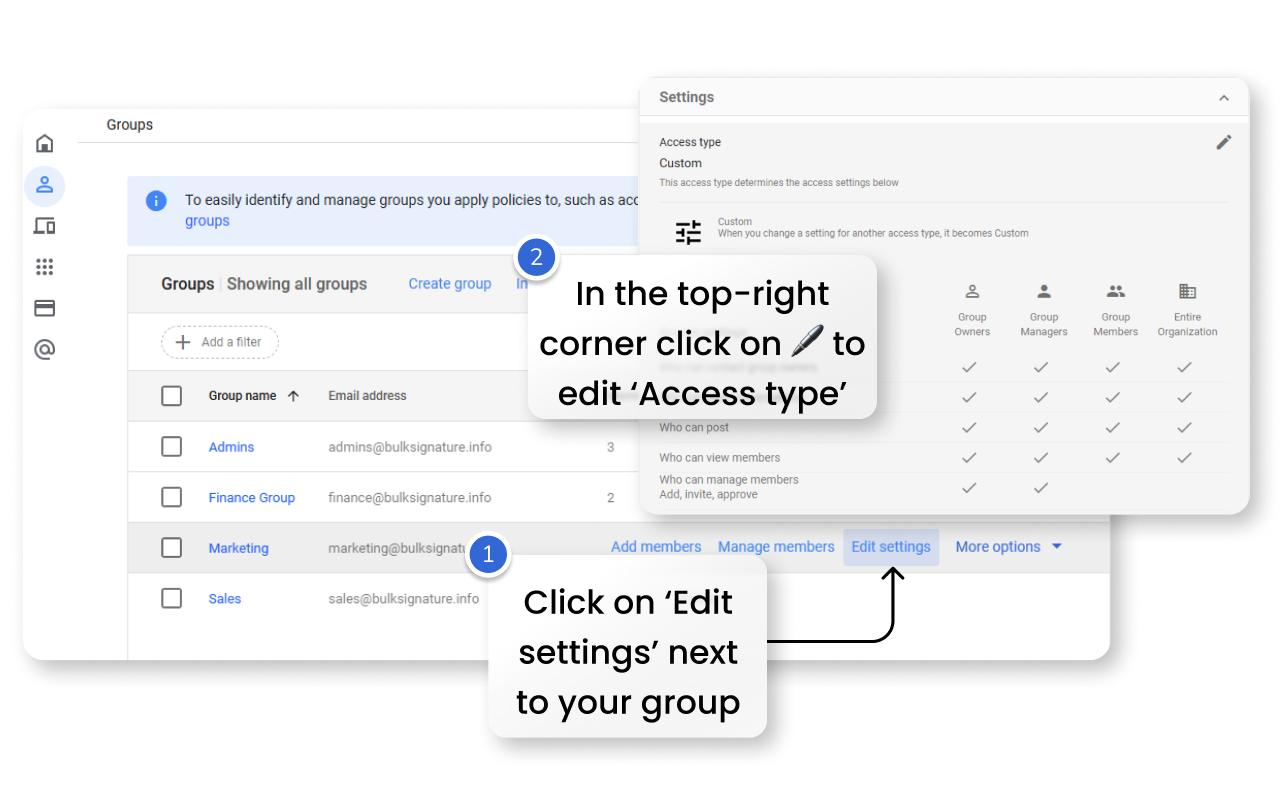
Hover on the group that you want to modify;
Click on ‘Edit Settings’
Locate and hover on ‘Access type’
In the top-right corner, you’ll find 🖊️, click on it to begin editing
At the top of the ‘Access type’ pane, you can select ready-made presets
— Public: Anyone in your organization can post to and join the group
— Team: Anyone in your organization post to the group, but they must ask to join
— Announcements: Only group owners and mangers can post to the group, and anyone in your organization can join
— Restricted: Only group owners, managers, and members can post to the group, and people in your organization must ask to join
— Custom: Gets enabled only when you start editing the access settings (Custom mode allows you to set who can contact group owners, who can view conversations, who can post, who can view members, and who can manage members)After selecting the preset you can adjust it to your needs
You can also adjust who can join the group and if members from outside your organization are allowed
Once you have adjusted all settings, hit ‘Save’ at the bottom-right corner.

Here are some tips that you need to know when adjusting the settings:
In most cases, you don’t want ‘Entire organization’ to have access to your group owners, let alone External users. So, you can deselect them
When it comes to who you want to ‘View members’, it is common to deselect ‘Entire organization’
In the majority of cases, the ability to ‘View conversations’ should only be available to ‘Group members’, ‘Group managers’, and ‘Group owners’
If your collaborative inbox’s purpose is customer support or communication with external parties, you need to keep ‘Publish posts’ enabled for ‘External users’
In ‘Membership settings’, you need to have group managers and group owners able to add, approve, and invite new members to the email group
Further Settings Customization
In order to further customize your email group settings you need to locate ‘advanced settings’ at the bottom of the page.
If you end up getting 403 Error, you can follow the steps to get access to it:
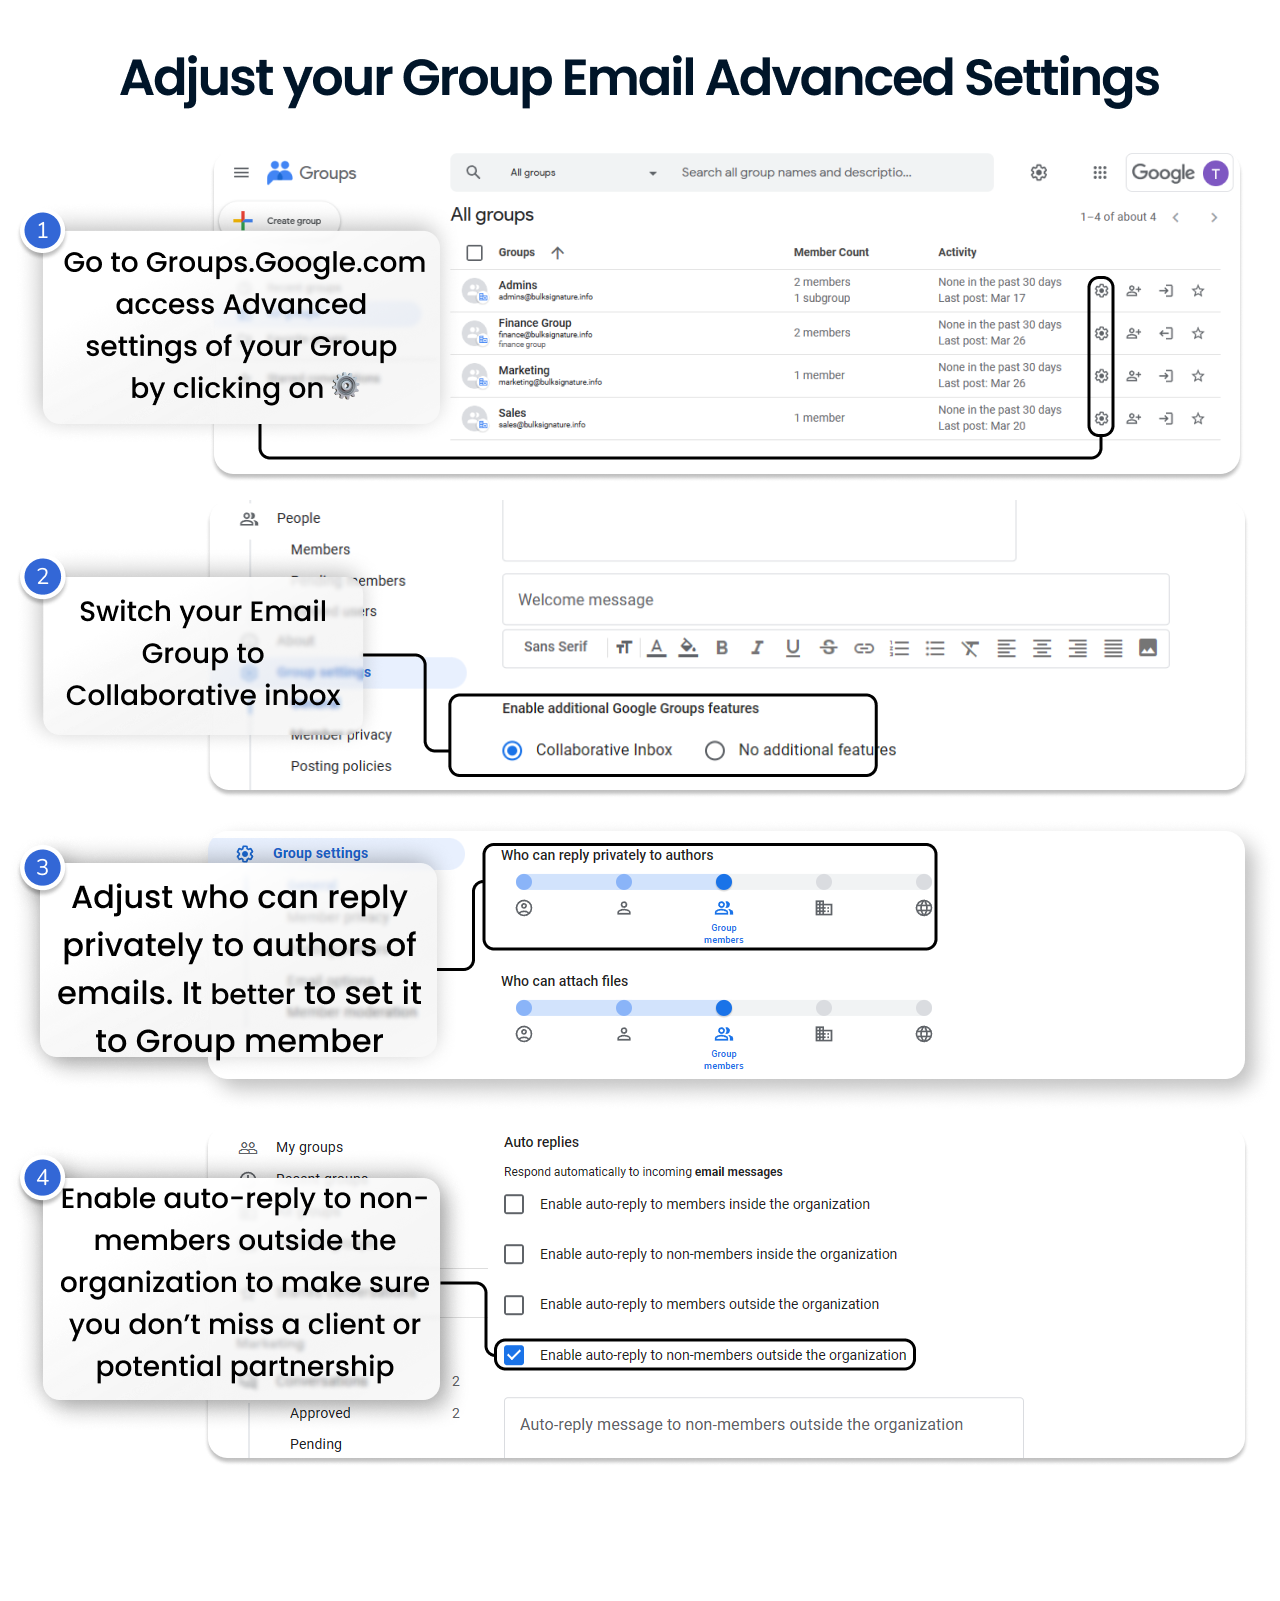
You can go to https://groups.google.com/
On the right pane, locate ‘All groups’
Find the group that you’d like to customize
Click on ⚙️ on the right side of the group you want to edit
Most of the settings can be left as default and there is no need to adjust them. One of the settings that we suggest to enable is ‘Collaborative inbox’ to do that you need to:
Locate ‘Enable additional Google Groups features’
Switch from ‘No additional features’ to ‘Collaborative inbox’
Another valuable setting to adjust is ‘Who can reply privately to authors’. You want your members to reply privately to authors since it allows you to keep the conversations with external parties clean and avoid confusion. To enable it, you need to:
Scroll down to ‘Posting Policies’
Locate ‘Who can reply privately to authors’
Set the toggle to ‘Group members’
It is also suggested that you adjust ‘Spam message handling’. It may affect some important emails that you do not want to miss. To make sure it doesn’t happen, you need to do the following:
Scroll down the ‘Posting Policies’
Locate ‘Spam message handling’
Set it to ‘Post suspicious messages to the group
In the ‘Email Options’ section below, you might also want to add a subject prefix. It will automatically add text to the beginning of email subjects to identify group messages. It might be useful when you use your collaborative inbox for the purpose of communication with external parties. Keep in mind you need to have it surrounded with [ ]. For example: [marketing-team]
In some cases, your group members might not be able to reply to some of the external messages that might open potential opportunities for partnership. Thus, enabling auto replies might be a good decision.
Navigate to ‘Auto replies’
Enable ‘Auto-reply to non-members outside the organization’
Compose your auto-reply message for non-members (Example: Thanks for reaching out to the marketing team of Company Name. We will get back to as soon as possible)
- Make sure you hit the ‘Save’ button before leaving the page.
Key takeaways
- Creating groups from the Google Admin app allows you to adjust number of settings
- If you weren’t able to find the advanced settings, don’t hesitate to go to groups.google.com and customize your settings from there. Google Groups is fully synced with your Google Workspace
- Make sure you customized access settings to your needs from the Admin app, including who can join the group


