Organizational Units in Google Workspace are one of the key aspects of user management. As we already know, user management implies managing the digital identities of employees in an organization. This way, OUs help super admins in separating users into groups with deeply customizable features that allow you to enhance monitoring and adjust them depending on their department in an organization.
What is an Organizational Unit in Google Workspace?
Google Workplace Organizational Units are known to be a hierarchical grouping feature that is developed by the super admin of an organization. Each OU can have a specific set of permissions and settings. Super admins can set up OUs based on roles or even apps. On top of that, they allow you to create teams, departments, etc.
This way, for instance, you can provide your Marketing OU with access to Google Analytics, Google Ads, and so on. For other organizational units, you can set up restricted Google Drive, so that the sensitive files can be hidden from other OUs.
Organizational units are a way to organize users and apply different settings to them in Google Workspace. They are similar to folders in a file system, where each user can belong to only one organizational unit. OUs can be set up based on departments, locations, or other criteria, allowing administrators to manage access, policies, and settings for different groups within the organization. OUs provide a hierarchical structure that reflects the organization’s organizational and functional structure, making it easier to apply policies and permissions consistently across different teams or departments.
What is Google Groups?
Organizational Units in Google Admin console tend to be confused with another service of Google, which is known as Google Groups.
Google Groups is a convenient platform mainly focused on email group communication. It simplifies the overall process of communication between departments, teams, and more.
Google Groups are best known for allowing you to use a single email address for a whole group of people. The feature has a number of use cases that can drastically affect your internal and external communication:
Save time by sending group emails (one address for multiple users).
Enable quick communication with your teams.
Organize events conveniently within seconds.
Empower collaboration between your teams and departments.
Share content with multiple users in your organization within a moment.
No need to worry about growing your organization and rotating positions.
On top of that, there is a Google Groups for Business that provides several additional features, including more thorough group management and the option to manage access to applications, documents, calendars, and media.
What is the key difference between Google Organizational Units (OU) vs. Google Groups
Even though both Organizational Units and Google Groups are closely interrelated, they are still pretty different in their functionality and, in some way, they complement each other and expand their features.
OUs build your organizational hierarchy. At the same time, Google Groups provide you with an option to customize them without changing your organizational structure. Here it should be pointed out that users can belong to only one OU, but the number of Groups is not limited. Thus, while OUs are used for broad organizational structure, groups’ primary purpose is specific adjustments.
Key differences between Google Organizational Units (OU) vs Google Groups:
Settings configuration can only be performed through the Organizations control panel or Google Admin console.
On Google Groups you can turn on your services that will override the organization settings.
You can turn the services on or off depending on your needs only on your Google Admin console, while Google Groups only allows you to turn them on.
Google Groups is compatible with the limited number of services (Google Workspace core and additional apps).
Google Admin console gives you a full set of applications adjustments.
Google Groups allows you to include external users, while on Organization control panel you can only add and customize internal users.
Automatic user licensing works only on the Organization control panel.
Should I use Organizational Units or Google Groups?
Both Organizational Units and Google Groups are tightly interdependent. However, you must understand that they serve different purposes. While OUs allow you to build a sophisticated organizational hierarchy, Google Groups is a simpler tool, whose purpose lies in optimizing organizational communication.
We suggest that you look into the use of both platforms. This will allow you to deeply customize almost everything to your needs. On top of that, your OUs get synced with your Google Groups. You don’t have to create all the groups from scratch.
Why Organizational Units in Google Workspace are Important
Google Organizational Units provide a huge number of advantages to your business allowing you to create a thoroughly customizable hierarchy. However, two main advantages are Context-Aware Access and User Service Control
Organizational Units in Google Workspace provide a broad number of benefits that may significantly streamline a range of organizational processes. Here are 4 key benefits of Organizational Units:
Customizing services and features: You have the flexibility to choose which services and features are available to specific users. This means you can enable services like Gmail for some users while disabling it for others, ensuring that each group gets the functionality they need.
Enhancing security: You have the power to set different security policies and access levels for different user groups. For example, you can enforce additional layers of security like two-step verification or restrict sign-in locations for certain users. This helps maintain a secure environment while offering appropriate access to different groups.
Delegating administrative roles: You can delegate administrative roles and permissions to different groups of users. This means certain users can be trusted to manage user accounts or groups within their organizational unit, streamlining administrative responsibilities and ensuring efficient management.
Applying personalized Chrome policies and device settings: You can apply specific Chrome policies and device settings to different user groups. For instance, you can allow some users to install extensions or apps on their Chrome devices while restricting this privilege for others. This allows for a more tailored and customizable experience based on user needs and preferences.
This set of capabilities allows you to cater to the specific requirements, preferences, and security needs of different user groups within your organization, enhancing efficiency and personalization.
How should Google Organizational Structure look like?
Google Organizational Structure is supposed to reflect hierarchy of your company. The traditional corporate hierarchy has employees at the bottom, middle management above them, and upper management at the top of the hierarchy.

When it comes to forms of structures on Google Workspace, you need to stick to creating parent OUs and further child OUs, e.g.: Marketing (parent OU)>SMM (child OU 1); SEO (child OU 2); Advertising (child OU 3). This way by creating separate parent OUs for each department you will be able to develop a comprehensive hierarchical structure of your company with deeply customizable permissions.
How to Properly Set Up Organizational Units in Google Workspace
To create and manage organizational units, you need to sign in to the Google Admin console and go to the Organizational Units section. You can create up to 5,000 organizational units per domain, and nest them up to 20 levels deep. You can also move users between organizational units or change the settings of an organizational unit at any time.
How to Create Organization Units
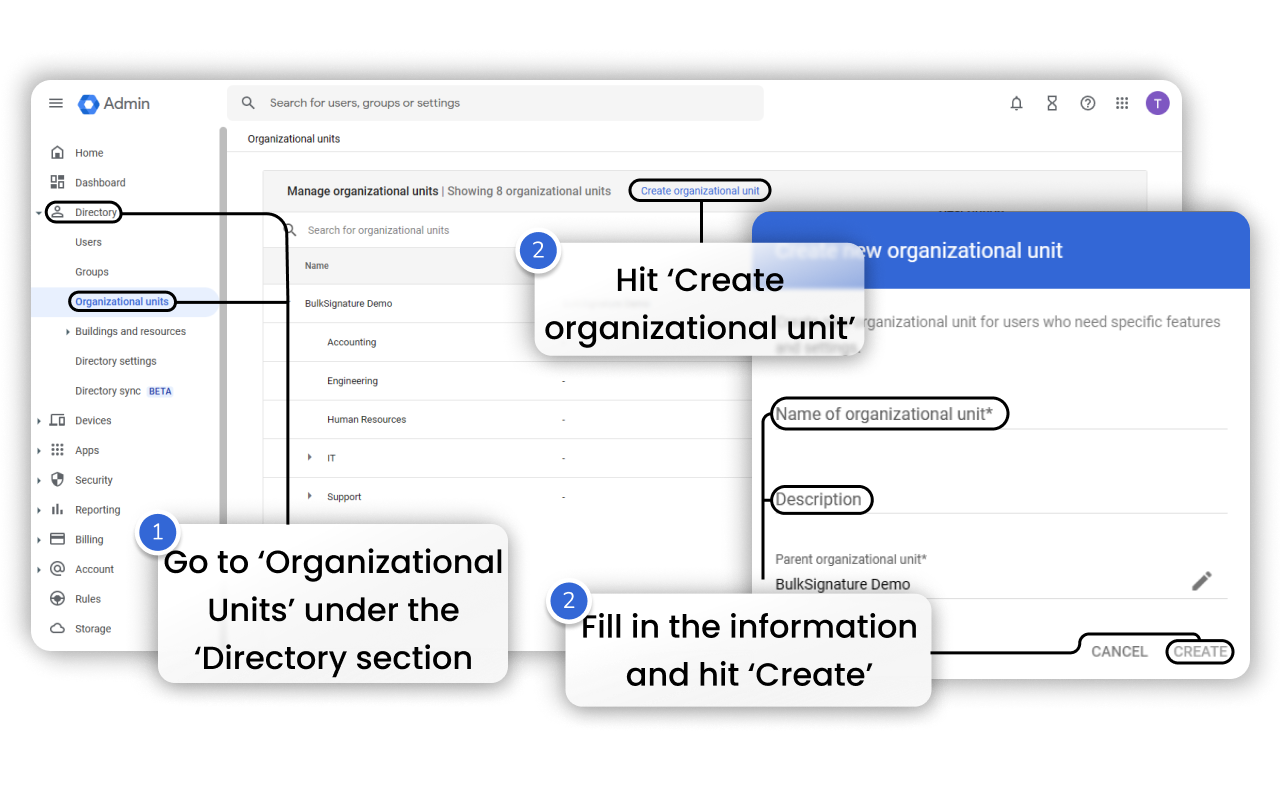
To create or add a new organizational unit you need to follow the steps:
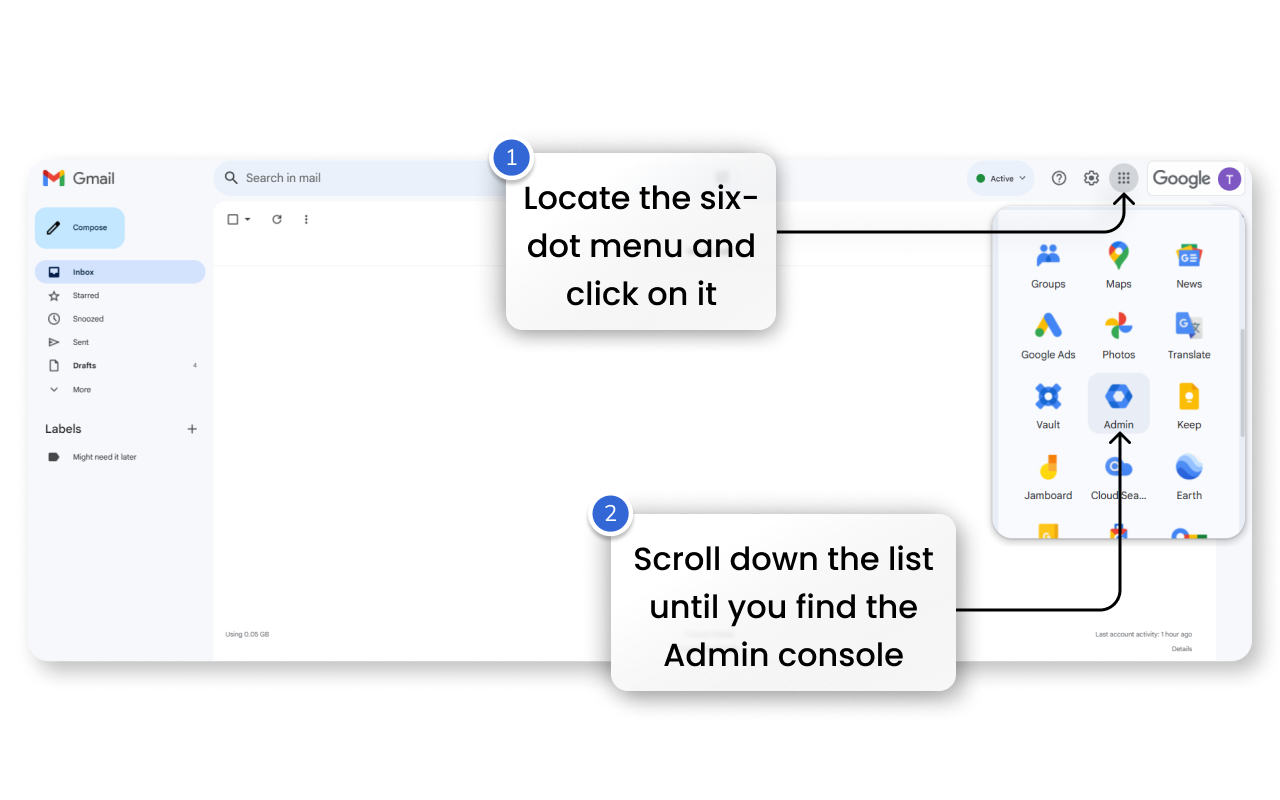
- Go to Google Admin Console or access it from the app menu in your Gmail.
- Go to Directory.
- Locate Organizational Units.
- In the opened page click Create organizational unit at the top of the pane.
- Name the organizational unit.
- Add the description if needed.
- Select Parent organizational unit.
- Hit Create.
How to Add Users to an Organizational Unit
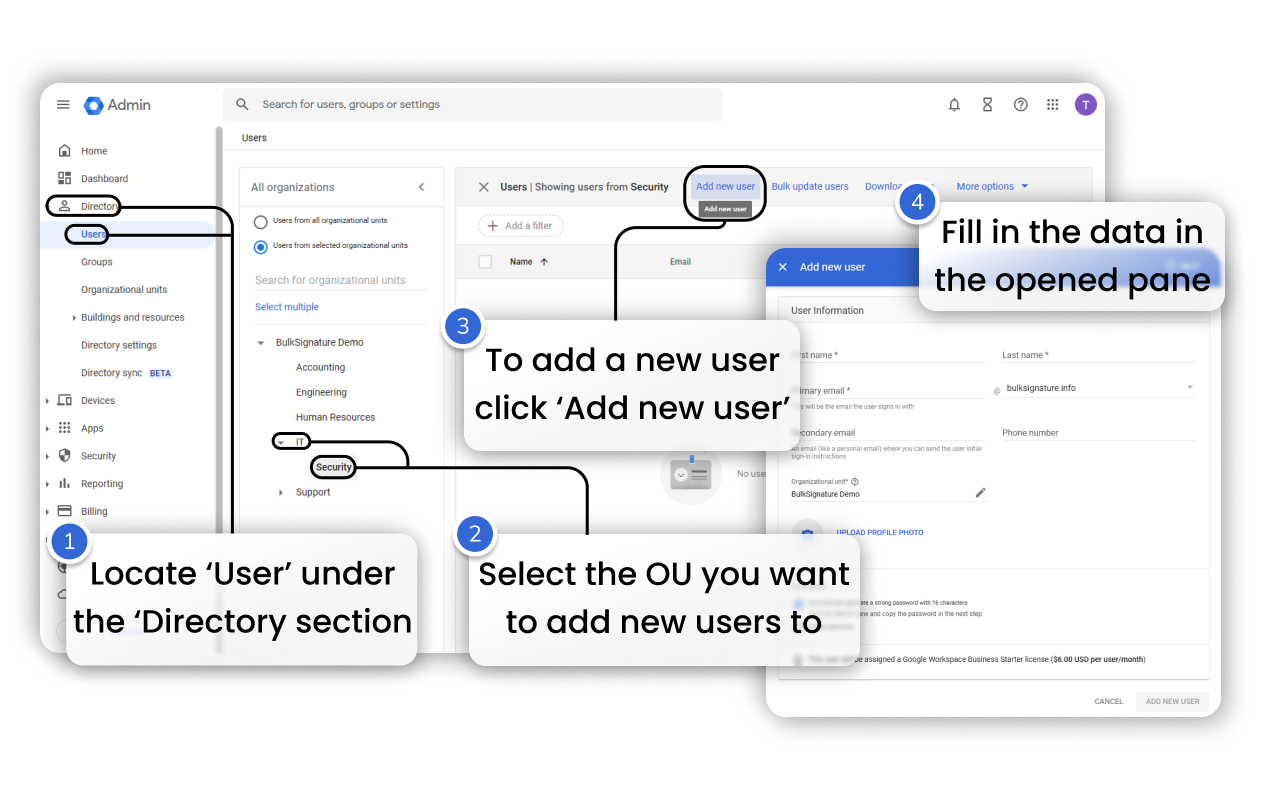
The process of adding new users to organizational units is performed through the Users section, to do that you need to:
- Go to Google Admin Console or access it from the app menu in your Gmail.
- Open Directory.
- Go to Users.
- Locate the list of organizational units on the left side of the page.
- From there select the Organizational Unit you’d like to add new users to.
- Click Add new users at the top of the page.
- Fill in the information about the user.
- Hit Add new user.
How to Move Users from one Organizational Unit to Another
To move the existing users from one organizational unit to another, you need to:
- Open Google Admin Console.
- Open Directory.
- Go to Users.
- Select the users you want to move by clicking on the checkboxes.
- Click on More options.
- Hit Change organizational unit.
- Select the organizational unit you want to move the users to.
- Hit Continue.
- Click Change after reviewing the conditions

How to delete users from organizational units
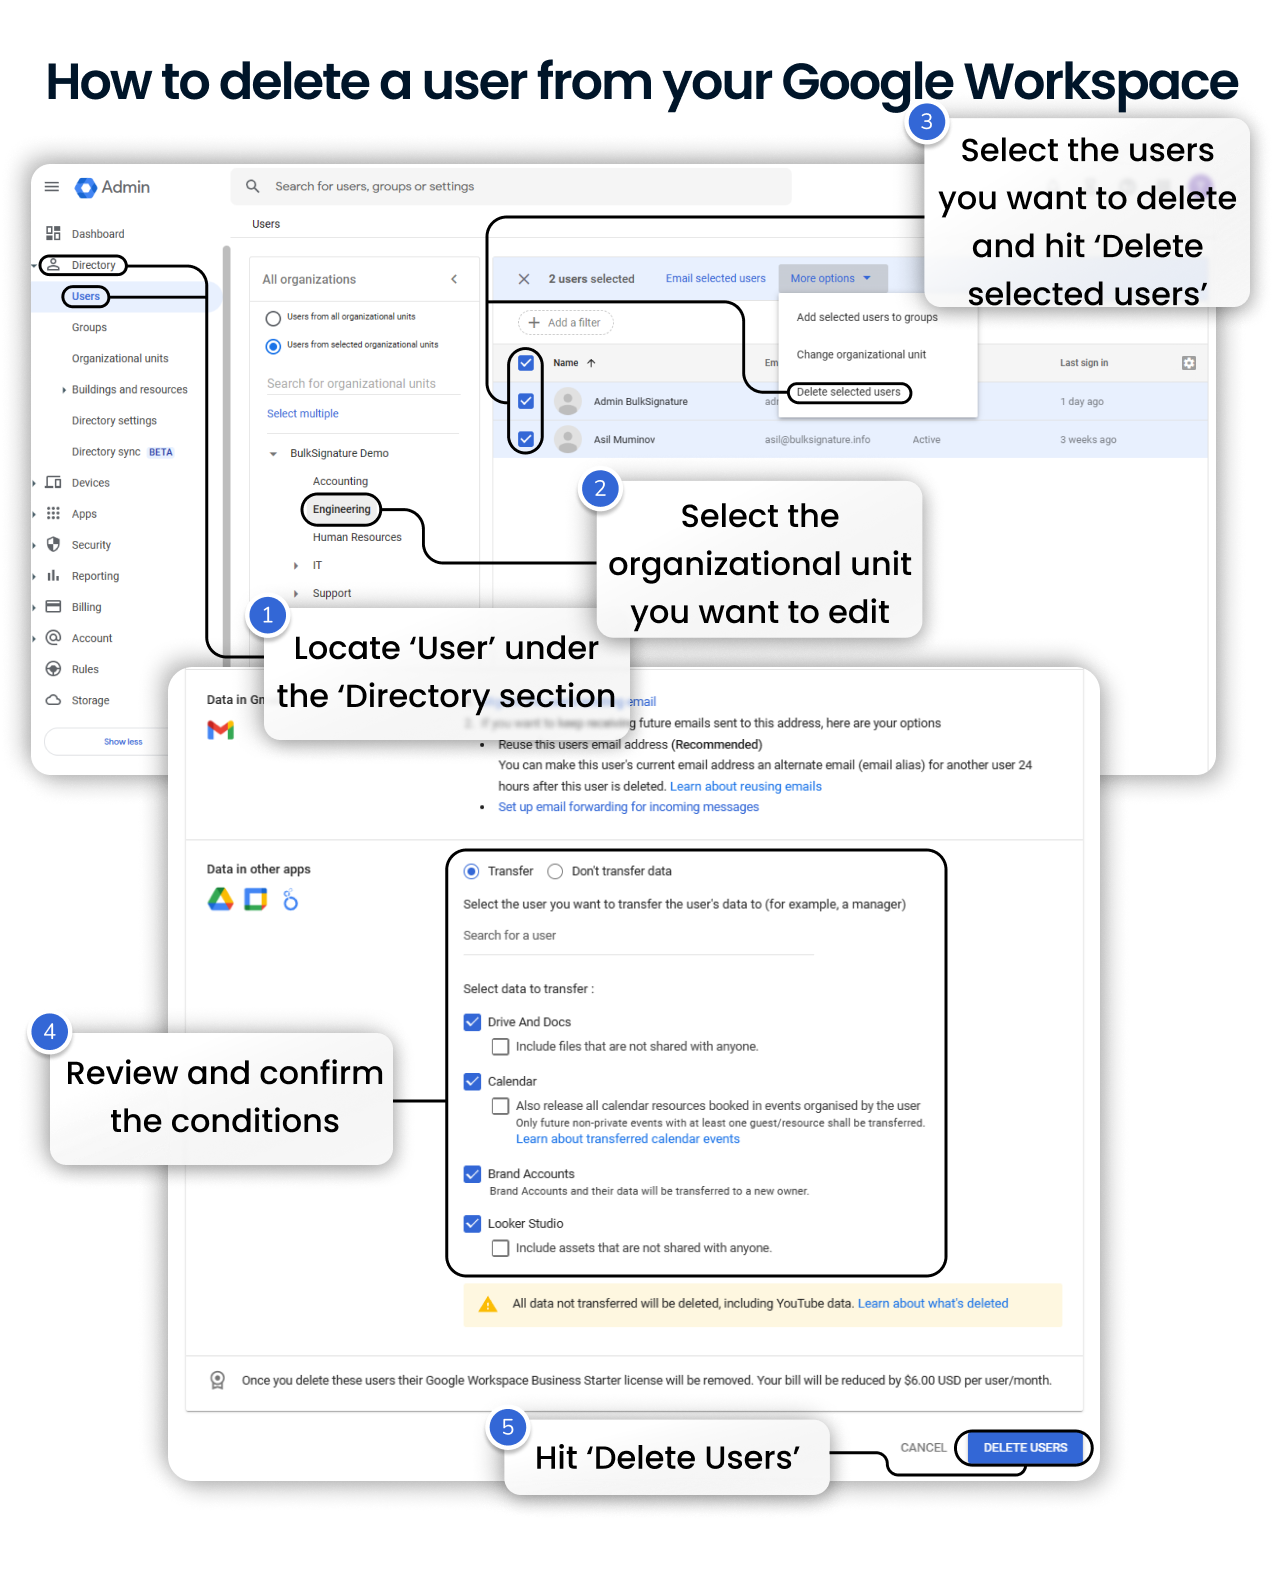
Deleting users from your organizational units is not the same as suspending them. These are two different functionalities. Suspend user means that the user’s data will be kept, but they won’t receive emails, calendar invitations, or files as long as they’re suspended. They can also be restored at any moment. Deleting users implies total removal. While Google charges you for the suspended users, it’s not the case when it come to the deleted users. To delete users from your organizational units, you need to follow the steps:
- Open Google Admin Console.
- Go to Directory.
- Open Users.
- Select the users you want to delete.
- Hit More options at the top menu.
- Click Delete selected users.
- Review and confirm the conditions.
- Hit Delete users.
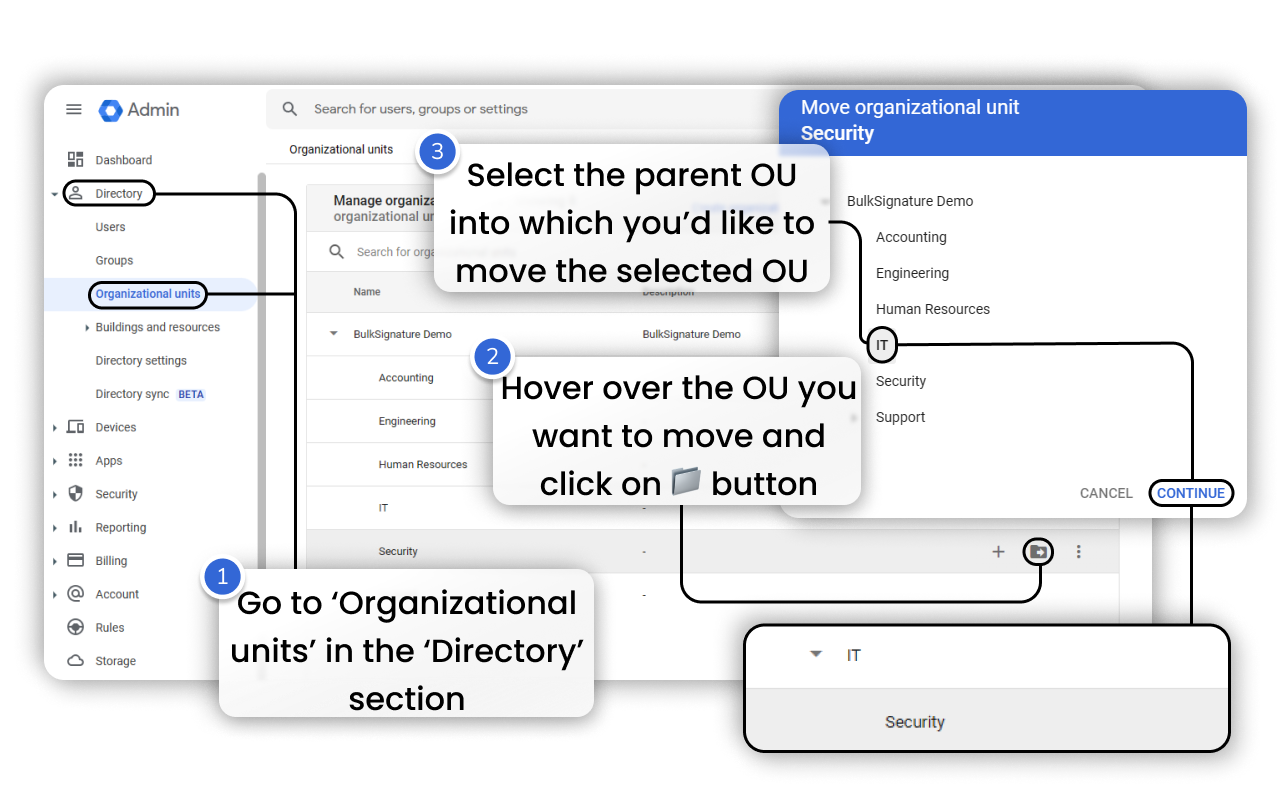
How to Manage Organizational Structure
Google Workspace Organizational Units allow you to create a deeply customizable organizational structure with several levels of parent and child organizational units. This way, you can build a very flexible hierarchy. To manage your organizational structure, you need to:
- Open Google Admin Console.
- Go to Directory.
- Locate Organizational Units.
- Select an organizational unit that you would like to move to an upper or a lower levels.
- Click on 📁 (Move organizational unit) on the right of the selected OU.
- In the opened window choose the OU where you want to locate the selected OU.
- Hit Continue.
- Confirm the conditions.
How to Control App Access for Different Organizational Units
Another convenient feature that is powered by Google Organizational Units is the ability to turn on or off selected services for the determined groups of your organization. Some departments might not need the use of some Google Tools or any other applications from Google Workspace Marketplace.
To control app access for different organizational units you need to:
- Open Google Admin Console.
- Go to Apps.
- Depending on the applications you want to set up you can select one of the options below the Apps section (Overview – All Apps, Googe Workspace – Standard Google Apps, Additional Google Services – Additional Google Apps, Google Workspace Marketplace apps – third-party apps from Google Workspace).
- Select the organizational unit on the left whose app access you want to edit.
- Hit the checkboxes of the apps that you want to turn off for the selected group.
- Hit ON or OFF depending on your needs.
- Click INHERIT if you want your app access to be inherited from their parent organizational unit.
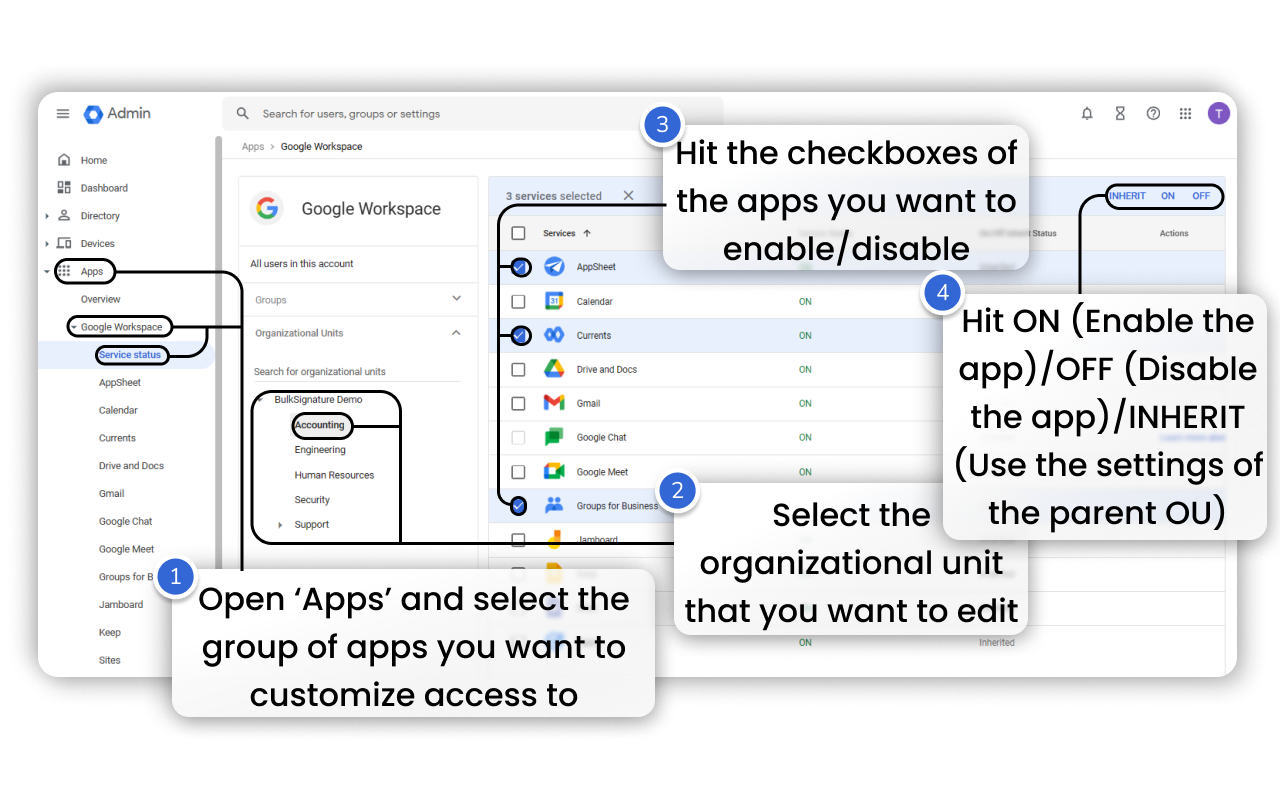
This way, for example, you can have Search Console enabled for your marketing team only and turn it off for everyone else or enable Google Earth for your research department. The number of use cases is pretty immense, so it is about your company’s needs and requirements.
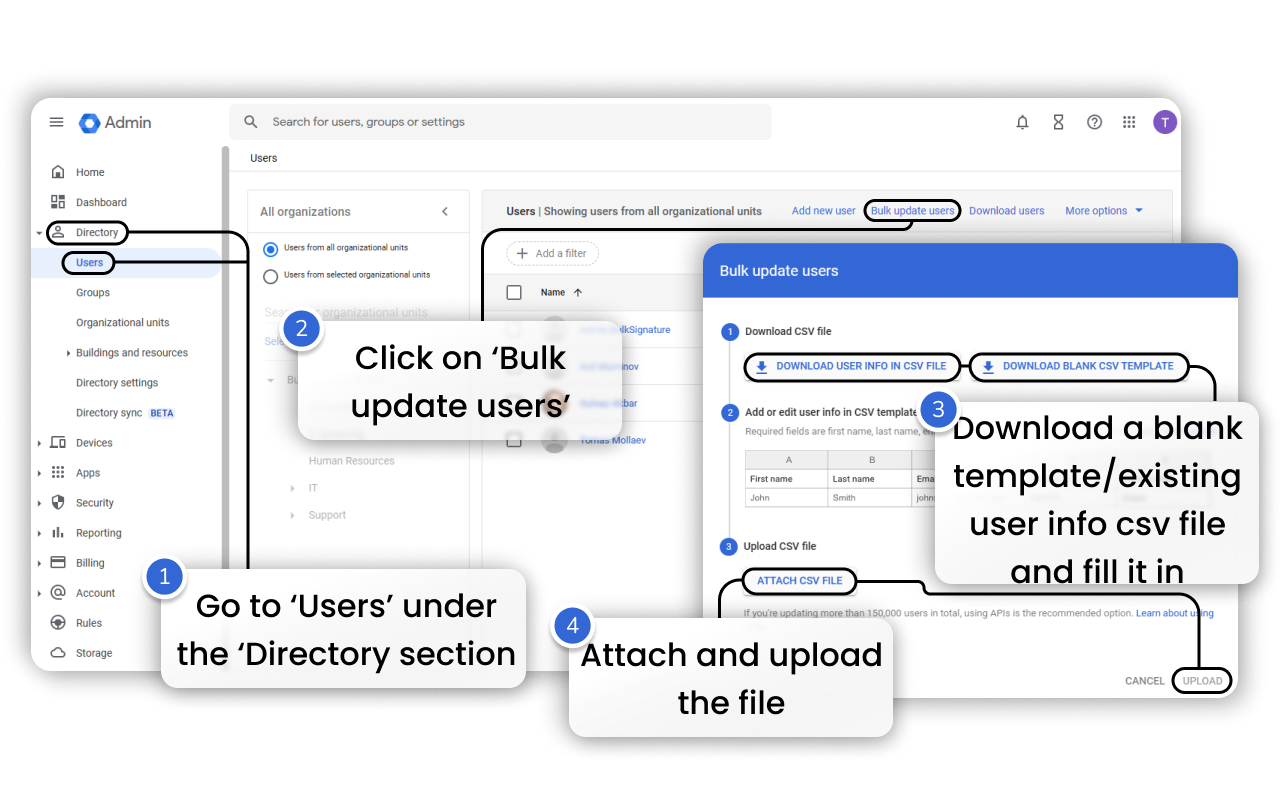
How to Update User Data in Bulk
Google Workspace Organizational Units allow you to update user data in a hassle-free way. Instead of manually entering the data. Fill in a CSV file and upload it to your Google Admin Console. Here’s how you can do it:
- Open Google Admin Console.
- Go to Directory.
- Click on Users.
- In the opened page locate Bulk Update Users.
- Download either a blank csv template or a user info CSV file that you can use to add more information.
- Fill in the details in the file.
- Upload the file.
How to Set User Access Based on Context using Organization Units
The biggest advantage of Google Organizational Units is their ability to adjust to the specific context. For instance, you can set up the tool to provide access to only a determined number of applications depending on a location or a device that’s being used.
This sort of selective security policies can give you more flexibility in terms of access management. To enable Context-Aware Access, you have to do the following:
Open the dropdown menu on the left.
Click on Show more at the bottom of the list.
Find and hit Security below Apps.
Open Access and data control.
Locate Context-Aware Access and enable it by clicking Turn on.
Create access level for your needs.

Using the features you can enable such requirements as Device policy enforcement, IP address enforcement, etc. However, you need to keep in mind that you do not need to restrict your users from using communication tools like Gmail since most users today rely on mobile devices, especially during their out-of-office hours.
Tips for Using Google Organizational Units
To make the best out of your Google Organizational Unit experience you need to keep in mind:
The thoroughly structured employee hierarchy will significantly affect the efficiency of your company’s organization.
You can adjust the service settings for users in organizational units.
Your users can only be in one OU, in order to make more flexible changes use Google Groups.
Google OUs serve as a tool for broad organizational adjustments.
Google Groups has a huge number of flexible functionalities which makes it relatively difficult to control, choose reliable Group owners.
How to create email signatures for organizational units
Why would you want to create signatures for organizational units? Different email signatures for different departments are important because they help to establish departmental identity and maintain consistency within each department. Each department in an organization has its unique role and function, and their email signatures can reflect that. For instance, the marketing team might include social media links in their signatures, while the legal team might include disclaimers. Furthermore, having different signatures can help external recipients understand the sender’s role and department, facilitating more effective communication. Lastly, it promotes professionalism and leaves a positive impression about the organization’s attention to detail.
Organizational units are valuable for the overall control of your organizational structure and are a great tool for email signatures in combination with solutions like BulkSignature. Google Workspace Integration allows the solution to import your organizational units, allowing you to create email signatures for separate organizational units. This way, you can conveniently create and apply professional email signatures for members of each OU.
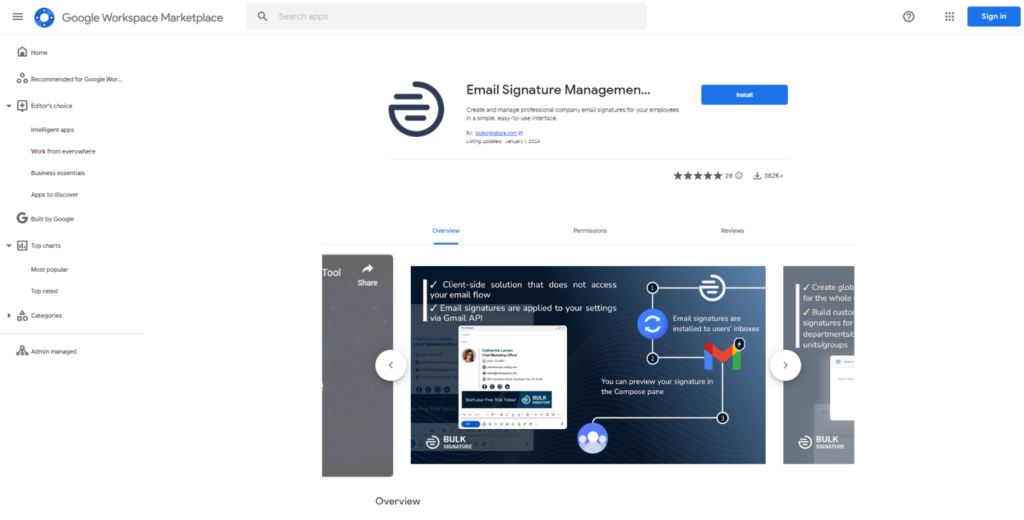
1. Get BulkSignature on Google Workspace Marketplace. You need to be logged in to your super admin account to perform the installation.
2. Log in to the BulkSignature application using your super admin Google account.
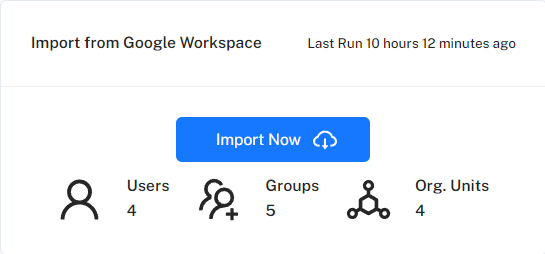
3. Navigate to the Company Data tab.
4. Click Import Now. This will import your user data from the Google Admin console, including groups, organizational units, etc.
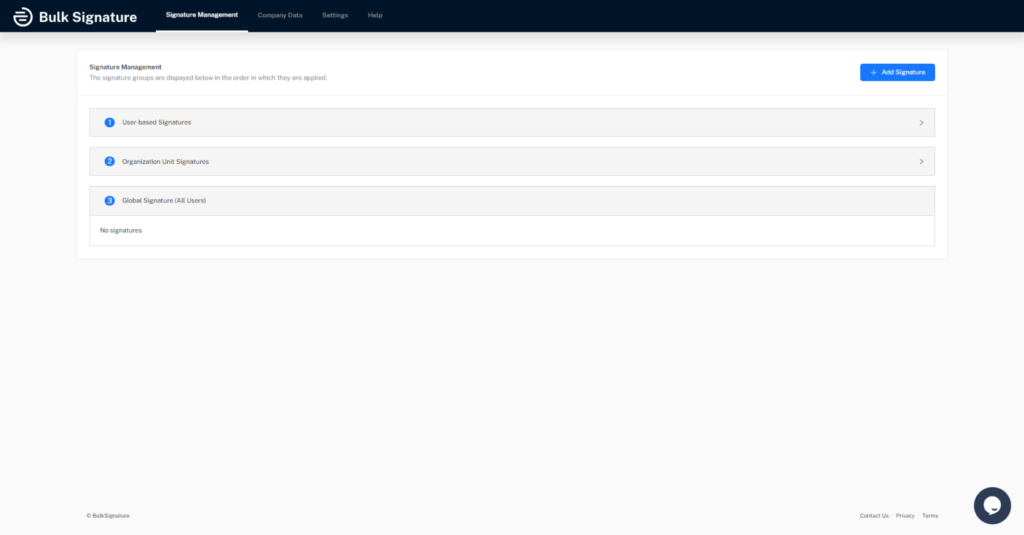
5. When your company data is successfully imported, you can move on to the signature-creating process. To do that, navigate to the Signature Management tab.
6. Click Add Signature in the top right.
7. Select customizable templates or design your email signature yourself. Not sure where to start? Check out our blog to find the core essentials of any email signature.
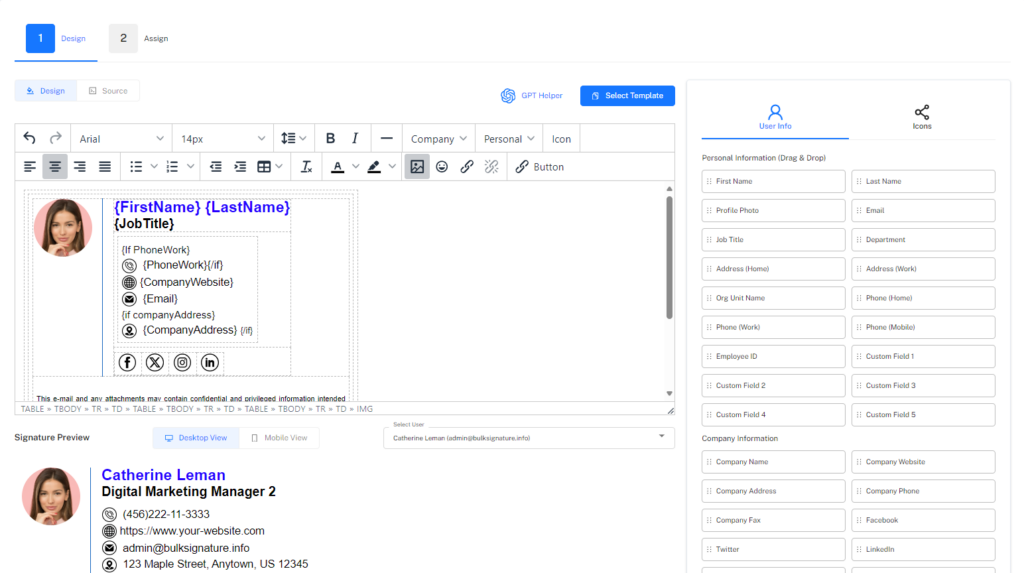
8. When your email signature is ready, you need to navigate to the Assign tab to apply the email signature.
9. In the Assign tab, set the signature type to Organizational Unit.
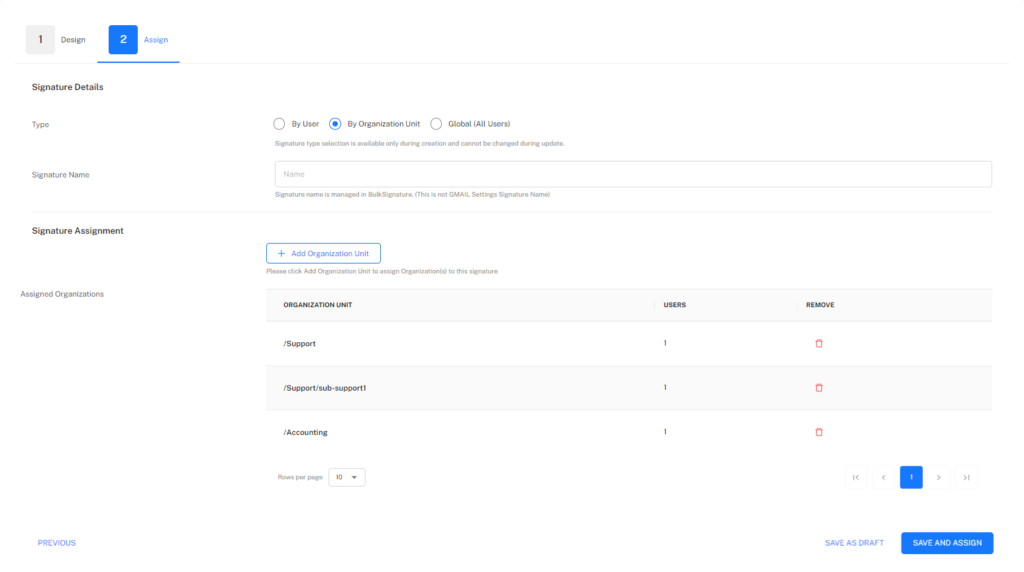
10. Enter the Signature Name.
11. Click Add organizational unit and select the ones that you want to apply the signature to.
12. Hit Save and Assign in the bottom right when you are done.
13. That’s it you email signature is successfully applied to the selected organizational units.
Conclusion
Summing it up, User Management enables administrators to grant access and manage user access while keeping digital assets secure.
User management software helps organizations gain productivity, security, and cost savings by automating user management processes.


