As organizations grow and evolve, managing user access to various services becomes increasingly complex. The Google Admin console provides powerful tools for customizing service and app access, allowing administrators to tailor permissions to specific roles, teams, or individuals. In this blog post, we’ll explore the ins and outs of customizing service access and share practical tips for efficient management. Learn how to properly customize app access on Google Admin console as a super administrator.
Contents
What is Google Admin console?
The Google Admin console is a centralized control panel where administrators manage Google Workspace and customize Google services for users within an organization. It can be accessed at admin.google.com. Make sure your super admin provided you with the privileges to access the dashboard.
Why is the app access customization important?
Imagine a scenario where an employee needs access to Google Drive for collaboration but doesn’t require Gmail or Calendar access. Or perhaps a department head needs additional privileges within specific organizational units. Customization allows you to fine-tune service access, ensuring that users have precisely the permissions they need—no more, no less.
Service/App access customization options
By default, there are two primary options that you can use to customize service access in your Google Admin console, namely by means of Organizational Units or Access Groups. Further, we will review each type separately, and learn how to combine both of them.
Customize service access using Organizational Units
An organizational unit is a hierarchical structure within your organization that allows you to group users, devices, and services. Here’s how OUs impact service access:
As an admin, you can turn off access to specific Google services (e.g., Google Drive) for an entire OU. For example, if the Marketing OU doesn’t need access to Drive, you can disable it at the OU level.
If some users within an OU require access to a service that’s turned off for their current OU, you have the option to move them to a different OU. For instance, if a marketing team member needs Google Drive, you can move them to an OU where Drive is enabled.
On the other hand, it is still possible to enable a service without removing a user from their OU. The solution lies in Access Groups (not to be confused with Google Groups).
Customize service/app access using Access Groups
Access groups are collections of users who share common access permissions. You can create custom access groups based on roles, projects, or any other criteria.
As it has been stated above, even if an OU has a service turned off, you can still grant access to specific users by adding them to an access group.
For example, create a “Drive Access” group and enable Drive for that group. Any member of the group can use Drive, regardless of their OU’s settings.
Practical Scenario
Problem: Some users from your Legal department need access to Google Meet, which is turned off for their OU.
Solution: Set up a “Legal Meet Access” group, enable Google Meet for the group and add the required users to it.
Use Case: App Access Customization of BulkSignature
Problem: Company X installed the BulkSignature application for the company-wide email signature management. 10% of users in the organization want to combine the use of their personal email signatures with the email signatures created in BulkSignature. Several points to keep in mind:
The user belong to different organizational units, and they cannot be assigned to specific organizational unit, since it will break the whole organizational structure of the company.
The users do not have to be present in the BulkSignature app.
The users mainly consist of team leaders and other specialists from different levels of the organization.
Solution: In order to not break the organizational structure of the company, we should not rely on the organizational unit’s application access. Instead, we will create access groups in Google Admin console.
We will add all users that need to be excluded from BulkSignature to a single access group, which can be called “BulkSignature Excluded list”. The rest of the users can be added to another group.
It is important to have the security label enabled, since it is recommended for enabling/disabling apps by groups.
After that, we will disable the BulkSignature app distribution for all organizational units.
We will then have to enable the application access for the group that has most of the users, and disable it for the “BulkSignature Excluded list”.
This way, we will be able to keep the email signatures, and allow the users to take advantage of their personal custom templates available on Gmail.
Basic Steps to Customize Service/App Access
In order to start with the service access customization, you need to have the super admin privileges in Google Admin console. To access your Google Admin console, you need to navigate to admin.google.com. Once you managed to access the dashboard, you can follow the steps below:

Open your Google Admin console.
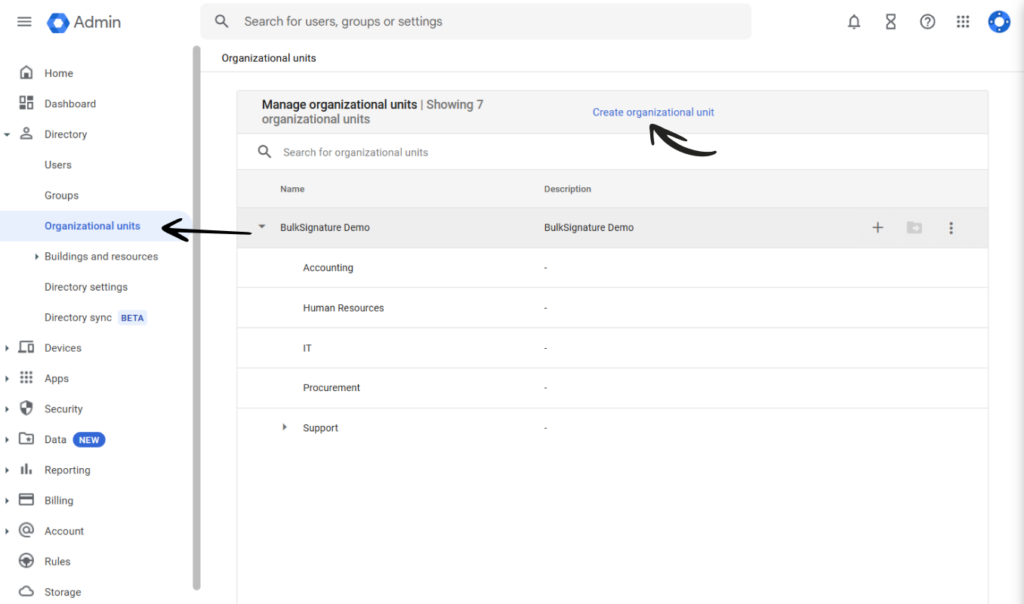
Navigate to Menu > Directory > Organizational units. (Learn how to set up organizational units in Google Admin console.)
Click Create organizational unit.
Complete the details about the organizational unit.
Save the changes.
Add the relevant users.
You can now navigate to Apps and enable/disable the application access to the OU.
Now, in order to customize the application access even further, you can create an access group. To learn more about the process, check the full guide on Groups in Google Workspace. General steps are as follows:

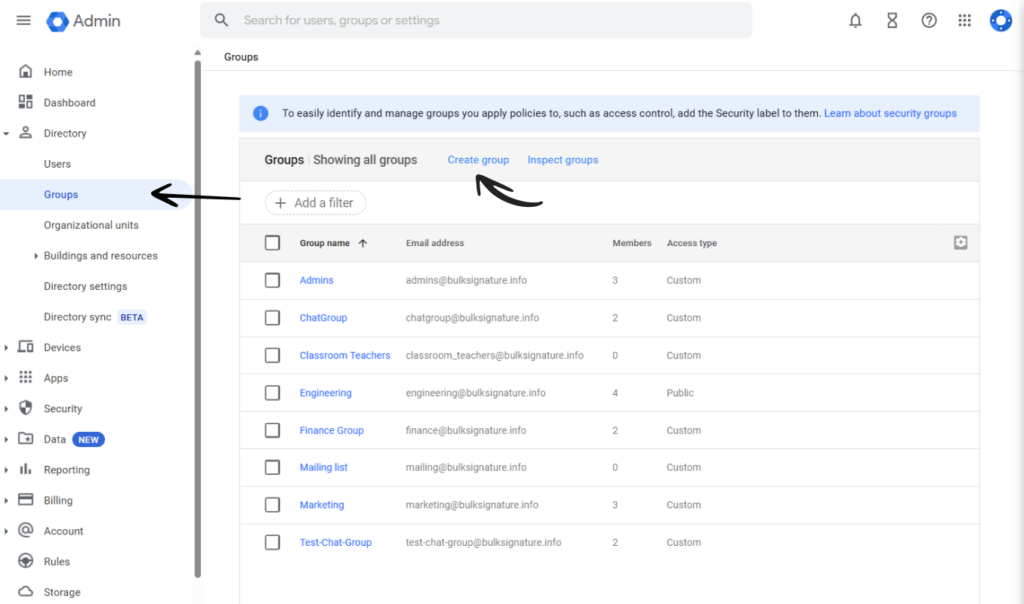
Navigate to Menu > Directory > Groups.
Click Create group.
Complete the details about the access group.
Save the changes.
Add the users to the Group.
After setting up your Access group, you can proceed with the services / applications access customization.

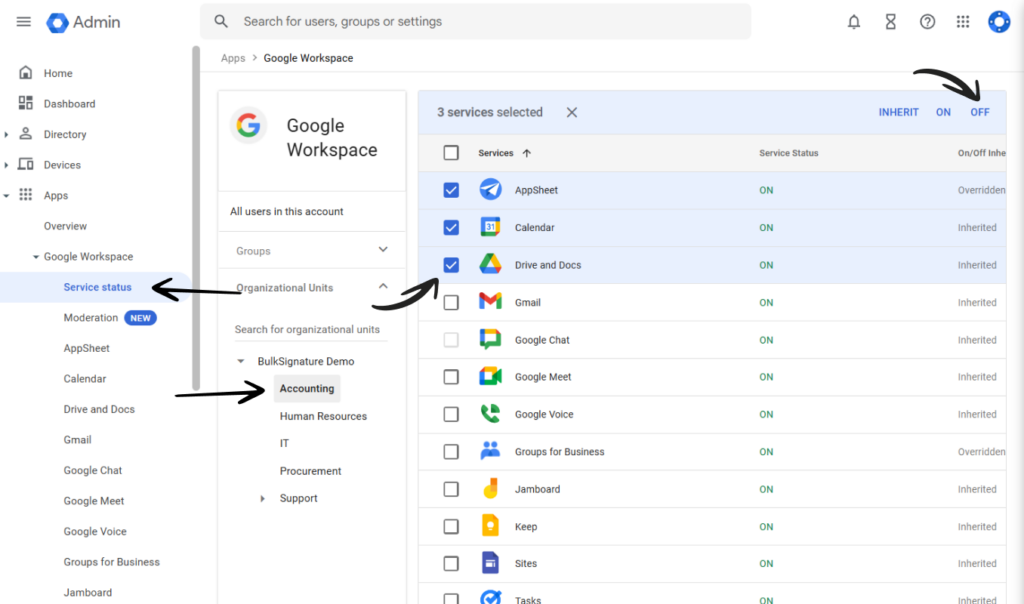
In your Google Admin console, navigate to the Apps section.
Select the apps section that you would like to customize the access to. (Google Workspace, Additional Google Services, Web and Mobile apps, Google Workspace Marketplace apps.)
Click on the organizational unit that you want to customize the service access to.
Select the app or check multiple boxes next to them.
Enable or disable the app access for the organizational unit.
Open Groups and enter the access group name that you want to modify.
Select the apps.
Change their status.
User Management Best Practices and Tips
Aside from the application / service access customization, there is also a huge set of best practices to follow to improve your organizational structure, and ensure productivity:
Assign appropriate roles to users based on their responsibilities. Use predefined roles like Super Admin, Admin, or custom roles.
Organize users into OUs based on their teams, departments, or locations.
Regularly review access groups to ensure they align with your organization’s needs.
Streamline user onboarding by creating templates for common roles.
Conduct periodic audits of user accounts, permissions, and access.
Monitor user activity and set up alerts for suspicious behavior.
Conclusion
By leveraging access groups and organizational units, administrators can fine-tune service availability for specific users while maintaining a secure and efficient environment.
Here are the key takeaways:
Access Groups: Access groups allow you to override organizational unit settings and enable services for select users. Whether it’s granting access to a specific app or ensuring critical services are available to essential teams, access groups provide flexibility without compromising security.
Organizational Units (OUs): Properly organizing users into OUs simplifies management. Apply settings at the OU level to enforce consistent policies and access controls. Remember to create separate OUs for temporary or contractor accounts.
User Management Best Practices:
Assign appropriate roles and permissions.
Streamline user onboarding and offboarding processes.
Implement security measures like strong password policies and two-factor authentication.
Foster a culture of security awareness through communication and training.
Staying productive as a super admin with BulkSignature
As super admins fine-tune service access for users, they often encounter routine tasks that demand attention. One such task is managing email signatures across the organization. Email signatures play a crucial role in maintaining a professional image and conveying essential information.
BulkSignature, a powerful tool designed for Google Workspace, simplifies the process of creating and deploying consistent email signatures. Here’s how it adds value:
Centralized Management: Super admins can create standardized email signature templates centrally. These templates can include user-specific details like name, title, contact information, and company branding.
Automated Deployment: With BulkSignature, applying signatures becomes a breeze. Admins can automatically append the correct signature to outgoing emails based on user profiles or organizational units.
Time Savings: By automating signature deployment, super admins reclaim valuable time. They can focus on strategic tasks rather than manually configuring signatures for each user.
Consistency and Compliance: BulkSignature ensures uniformity across the organization. Admins can enforce branding guidelines, legal disclaimers, and other essential elements.
Customization Options: Tailor signatures for different teams or departments while maintaining consistency. Include promotional banners, social media links, or other relevant content.
In summary, while managing service access, super admins can leverage tools like BulkSignature to optimize email signature management. By doing so, they prioritize essential tasks, enhance efficiency, and maintain a professional communication standard.
