
You’ve just joined a new company, set up your Outlook account, and fired off your first few emails. You’re feeling pretty productive, until someone replies asking why your emails don’t include a signature.
No problem. You head to your settings in Outlook, expecting a quick fix… only to realize the layout looks nothing like the tutorial you found in your onboarding materials. That’s because Outlook has three separate versions, and most tutorials only cover one.
So to help you quickly get your Outlook email signature set up, we’ve created this simple guide that walks you through the process across all three platforms: Outlook mobile app, Outlook desktop (Windows and Mac), and Outlook on the web.
We’ll also cover some common formatting pitfalls and what to do when your signature isn’t displaying correctly.
Why Outlook Signature Settings Vary by Platform
But before we get to the specifics of how to add a signature in Outlook apps, it’s worth understanding why Outlook behaves differently depending on where you’re using it.
Here’s a quick rundown:
- The Outlook desktop app is the full-featured application installed on your computer. It has the most formatting options and the most control over how your signature looks.
- Outlook on the web (sometimes called OWA, or Outlook Web App) is the browser-based version, which has a slightly different interface and fewer formatting options.
- The Outlook mobile app, available on iOS and Android, is the most limited of the three, and signatures created there are separate from the ones you set up on desktop or web. This means that if you set up a signature on your desktop, it won’t automatically appear when you send emails from your phone.
Basically, each platform needs to be configured independently. This is a common source of confusion, and it’s worth knowing upfront before you start!
How to Add a Signature in the Outlook Desktop App (Windows)
The desktop version of Outlook on Windows gives you the most control over your signature design, including font styling, images, and hyperlinks.
Step 1: Open the Signature Settings
Open Outlook and click on the “New Email” button to open a new message window. In the message window, go to the “Message” tab in the top ribbon. Click “Signature” in the toolbar, then select “Signatures…” from the dropdown menu.
This opens the Signatures and Stationery window, where you can create and manage all your signatures.
Step 2: Create a New Signature
In the Signatures and Stationery window, click “New” under the “Select signature to edit” section. Give your signature a name (something like “Work” or “Standard”) and click OK.
You’ll now see a blank text box in the “Edit signature” section at the bottom of the window. This is where you build your signature.
Step 3: Build Your Email Signature
Type your signature content directly into the edit box. A standard professional signature typically includes things like your:
- Full name
- Job title
- Company name
- Contact details
- Website URL
- Social media icons
You can format the text using the toolbar above the edit box. Options include font style, size, color, bold, italic, and alignment. You can also insert a company logo or profile image by clicking the image icon in the toolbar.
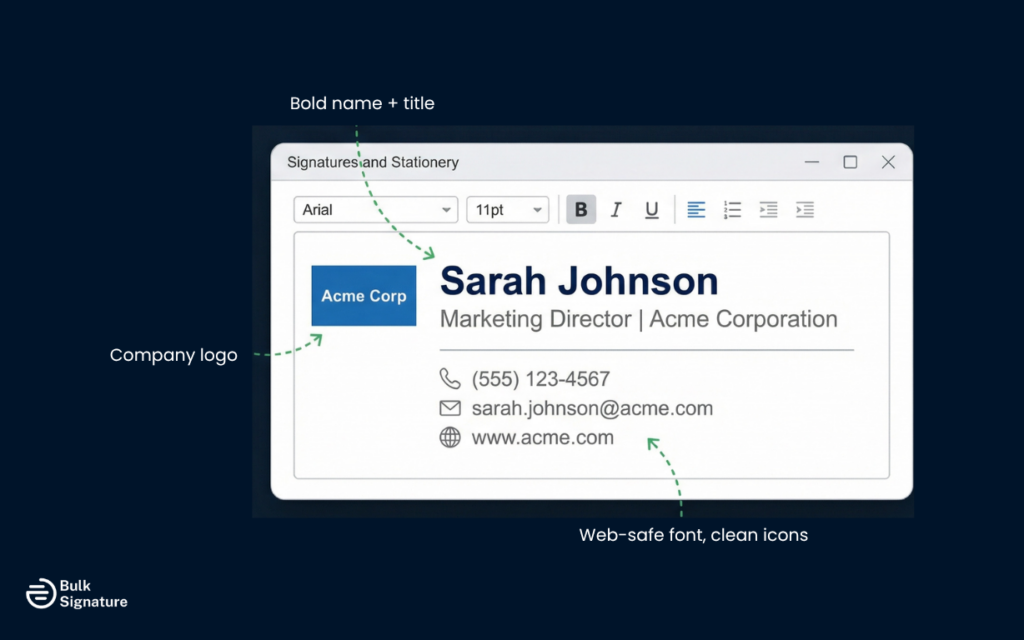
Keep the design clean and avoid using too many font styles or colors. A signature that looks polished on your screen may render differently in other email clients, so simpler is generally more reliable.
Want to make sure your signature looks polished and modern? Read this: Email Signature Design Trends To Watch In 2026
Step 4: Set Your Default Signature
Once you’re happy with the content, scroll up to the “Choose default signature” section at the top of the window. Use the dropdown menus to assign your new signature to “New messages” and “Replies/forwards” for the relevant email account.
If you leave these set to “(none)”, your signature won’t appear automatically. You’ll need to insert it manually each time.
Click OK to save your settings.
Step 5: Test Your Signature
Open a new email and check that your signature appears correctly. Then, send a test email to yourself and open it on a different device or email client to see how it renders. Make sure to pay attention to font consistency, image sizing, and whether any links are working correctly, and then make adjustments if you need to.
How to Add a Signature in the Outlook Desktop App (Mac)
The steps for Outlook on a Mac are similar to those for Windows, but the interface is laid out slightly differently.
Step 1: Open Preferences
Open Outlook on your Mac. In the top menu bar, click “Outlook” and then select “Preferences”. In the Preferences window, click “Signatures”.
Step 2: Create a New Signature
In the Signatures window, click the button at the bottom left corner to create a new signature. Give it a name, then click into the editing area on the right to start building your signature content.
Step 3: Build and Format Your Signature
Type your signature details into the editing area. You can use the formatting toolbar to adjust fonts, sizes, and colors, and you can drag and drop an image directly into the editor to add a logo or profile photo.
As with the Windows version, stick to web-safe fonts and keep the layout simple. Complex formatting is more likely to break when recipients open your emails in different clients.
More on email signature fonts here: The Best Fonts for Email Signatures That Look Clean and Professional
Step 4: Set Your Defaults
Use the “Default Signatures” section at the top of the window to assign your new signature to the correct account and set it as the default for new messages and replies. Close the window to save.
How to Add a Signature in Outlook on the Web
Outlook on the web has a slightly different layout, but the process is straightforward once you know where to look.
Step 1: Open Settings
Log in to Outlook on the web at outlook.office.com (or your organization’s equivalent). Click the gear icon in the top right corner to open the Settings panel. In the search bar at the top of the Settings panel, type “signature” and select “Email signature” from the results. Alternatively, scroll down to “Compose and reply” under the “Mail” section.
Step 2: Create and Customize Your Signature
You’ll see a text editor where you can type and format your signature. The formatting options here are more limited than the desktop version, but you can still adjust font style, size, and color, and add images or hyperlinks.
Type your signature content, apply any formatting, and give it a name if you’re creating multiple signatures.
Step 3: Set Your Defaults
Below the signature editor, you’ll find dropdown menus to set your signature as the default for new messages and for replies and forwards. Select your signature from the dropdowns.
Then, click “Save” to apply your settings.
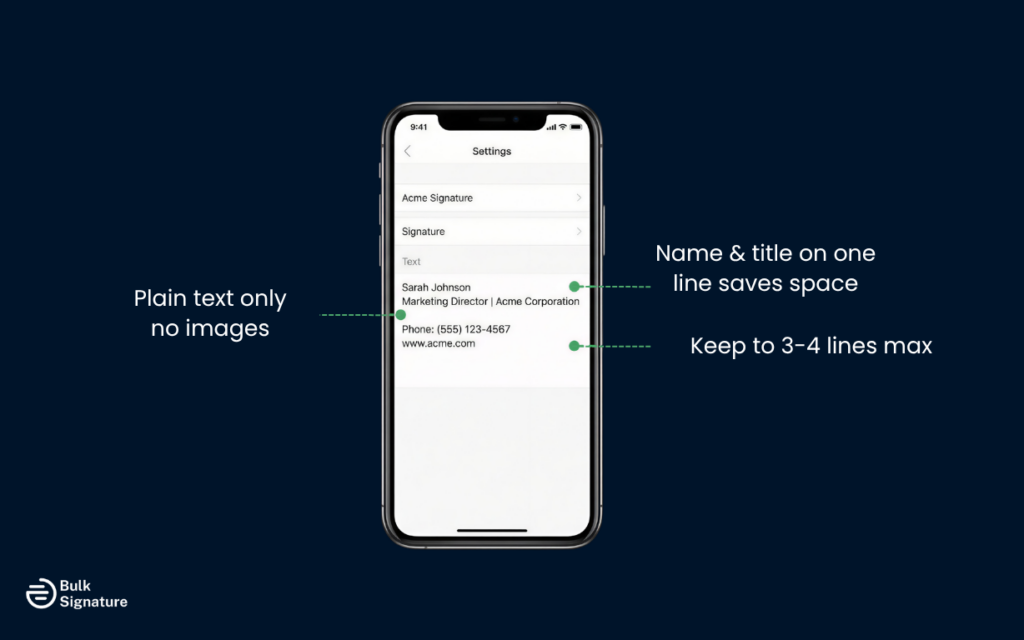
How to Add a Signature in the Outlook Mobile App
The Outlook mobile app handles signatures differently from the desktop and web versions. Signatures on mobile devices are plain text only, which means no images, no custom fonts, and no hyperlinks. This is a limitation of the mobile app, not something you can work around within the app itself.
Step 1: Open Outlook Settings in the App
Open the Outlook app on your iPhone or Android device. Tap your profile picture or initials in the top left corner to open the side menu. Tap the settings gear icon at the bottom left to open Settings.
Step 2: Find the Signature Setting
Scroll down and tap “Signature”. If you have multiple accounts connected to the app, you’ll see a toggle that lets you set different signatures for each account or use the same one across all accounts.
Step 3: Enter Your Desired Signature Text
Tap the text field and type your signature. Keep it concise, as mobile signatures are plain text and won’t carry any formatting from your desktop version.
A practical mobile signature might look something like this:
Once you’re happy with everything, tap the back arrow or navigate away to save automatically.
Want more mobile email signature design inspiration? Read this: Mobile Email Signature Examples That Work on Every Device.
Common Outlook Signature Problems and How to Fix Them
Even when you follow the steps correctly, things don’t always go to plan. Here are the most common issues with updating email Signatures in Outlook, and what you can do about them.
Adding Your Email Signature in Outlook: Troubleshooting Tips
Problem | Likely Cause | What to Do |
|---|---|---|
Signature not appearing automatically | Default signature not set | Go back to signature settings and assign the signature to “New messages” and/or “Replies/forwards” |
Signature looks different in other email clients | Custom fonts or complex HTML | Stick to web-safe fonts like Arial, Verdana, or Georgia and simplify the layout |
Logo or image file not displaying | Image hosted externally or blocked | Embed the image directly rather than linking to an external URL |
Mobile signature missing | Desktop and mobile are separate | Set up the signature separately in the Outlook mobile app |
Signature appears in replies but not new messages | Default settings misconfigured | Check the “New messages” dropdown in the signature settings and assign the correct signature |
Formatting breaks after copy-pasting | Hidden HTML from the source document | Type the signature directly in Outlook rather than pasting from Word or a web page |
If your signature is appearing inconsistently across devices, the most reliable fix is to keep the design as simple as possible. Plain text with minimal formatting will always render more consistently than a heavily styled HTML signature.
For more detailed guidance on creating and fixing your email signature in Outlook, we recommend checking out Microsoft’s official Outlook support documentation.
What to Do When You Need Consistent Signatures Across Your Organization
Setting up a signature for yourself is one thing. But making sure every person in your organization has a correctly formatted, up-to-date signature is a completely different story.
When signatures are managed individually, inconsistencies are almost inevitable. Someone uses the old logo, someone else skips the legal disclaimer, and a new starter copies a colleague’s signature, ending up with the wrong phone number for weeks, even months, until someone spots it.
This is where centralized email signature management becomes a no-brainer, with tools like BulkSignature allowing you to create a single approved template and push it to every inbox in your organization.

That means you don’t have to rely on individuals to configure their own settings, and any updates (like new campaign banners, revised disclaimers, or rebranded logos) can be centrally deployed across the entire team in minutes.
For organizations managing email signatures at scale, that level of control is a lot more practical (and efficient) than asking everyone to follow a tutorial.
If you’d like to see what this looks like in practice, try BulkSignature for free today and bring consistency and control to every email signature across your organization.
Frequently Asked Questions About How to Add a Signature in the Outlook App
Why does my Outlook signature look different on mobile?
Outlook on desktop and the Outlook mobile app use separate signature settings.
That means a signature you create on the desktop app won’t carry over to the mobile app automatically, so you’ll need to set up a plain-text signature separately within the Outlook mobile app. It’s also important to note that mobile signatures don’t support images or custom formatting, so make sure to keep them simple and text-based.
Can I have more than one signature in Outlook?
Yes. Outlook desktop and Outlook on the web both allow you to create multiple signatures and assign different ones as defaults for new messages versus replies and forwards. You can also manually select a different signature when composing a message by clicking the “Signature” button in the message toolbar.
Why isn’t my signature showing up automatically?
The most common reason is that the default signature hasn’t been assigned. After creating a signature, you need to go back into the signature settings and use the dropdown menus to set it as the default for new messages and/or replies. If those dropdowns are set to “(none)”, the signature won’t appear automatically.


