You’ve just been promoted, changed departments, or updated your contact details. Now you need to update your email signature in Outlook, but you can’t quite remember where the settings are. You click through menu after menu, and now you’re left wondering why something so simple feels so… complicated.
If this sounds familiar, you’re definitely not alone.
Microsoft Outlook has evolved over the years, and the process for changing your email signature varies depending on which version you’re using.
To help, we’ve created this step-by-step guide that walks you through exactly how to change your email signature in Outlook on desktop, web, and the mobile app. We’ll also throw in a few tips for customizing your signature like a pro.
How to Change Email Signature in Outlook Desktop
First up: desktop.
The Outlook desktop application is the most feature-rich version of Outlook, and it offers the most flexibility for creating and managing your email signature.
Here’s how to change your signature in the desktop version.
Step 1: Open Outlook Signature Settings
To access the signature settings in Outlook desktop, start by opening the application on your computer. Once Outlook is open, look for the signature settings in one of two places, depending on your version of Outlook.
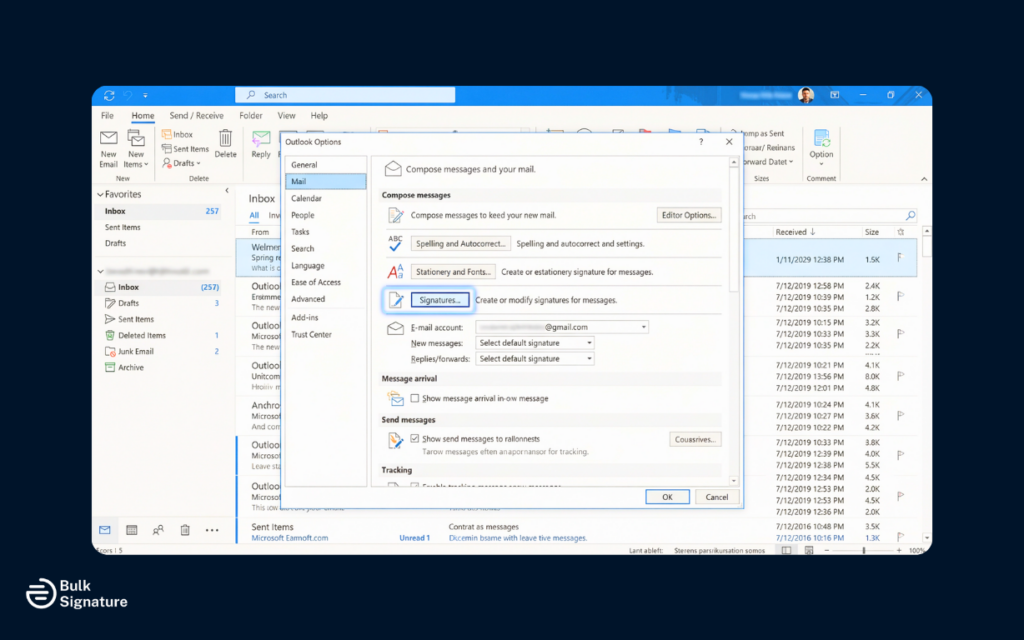
For most versions of Outlook, click on “File” in the top menu bar, then select “Options” from the menu. In the Outlook Options window, click on “Mail” in the left-hand menu. Scroll down until you see the “Signatures” button, and click it to open the signature editor.
If you’re using the new Outlook desktop application, the process is slightly different. Click on the settings gear icon in the top right corner of the window. In the settings menu, search for “signature” or navigate to “Mail” and then “Compose and reply.” You’ll find the signature settings there.
Step 2: Edit an Existing Signature
Once you’re in the signature editor, you’ll see a list of your existing signatures. To edit an existing signature, simply select it from the list and make your desired changes in the edit signature box below.
To create a new signature, click the “New” button. You’ll be prompted to enter a signature name. Choose a descriptive name that helps you identify the signature later, such as “Work Signature” or “Professional.”
Step 3: Add Your Signature Content
In the signature text box, you can now edit/add all your essential contact information. This typically includes your full name, job title, company name, phone number, email address, and any other relevant details. You can also add your company logo or other images by clicking the image icon in the toolbar.
Use the formatting tools in the signature editor to change fonts, adjust text size, add colors, and create hyperlinks.
Pro Tip: Avoid excessive formatting or too many images, as this can make your signature look cluttered and may cause display issues in some email clients. More guidance on this here: Email Signature Size and Layout Tips
Step 4: Choose Default Signature
After you’ve edited your signature, you need to tell Outlook when to use it. In the signature settings, you’ll see two drop-down menus: one for “New messages” and one for “Replies/forwards.”
Use these menus to choose your default signature for each type of message. If you want the same signature for both new messages and replies, select the same signature from both drop-down menus. If you prefer a shorter signature for replies, you can select a different signature or choose “none.”
Step 5: Save Your Changes
Once you’re happy with your signature and have set your defaults, click “OK” to save your changes. Your new signature will now appear automatically in your emails according to the settings you chose.
How to Change Email Signature in Outlook on the Web
Next is Outlook on the web (formerly known as Outlook Web App or OWA). This is the browser-based version of Outlook that’s commonly used by people who access their work email through a web browser rather than a desktop application.
If this is you, here’s how you can change your email signature in the web version.
Step 1: Access Outlook Settings
Open your web browser and navigate to Outlook on the web. Then, sign in to your email account if you’re not already logged in. Once you’re in your inbox, look for the settings gear icon in the top right corner of the screen. Click on it to open the settings menu.
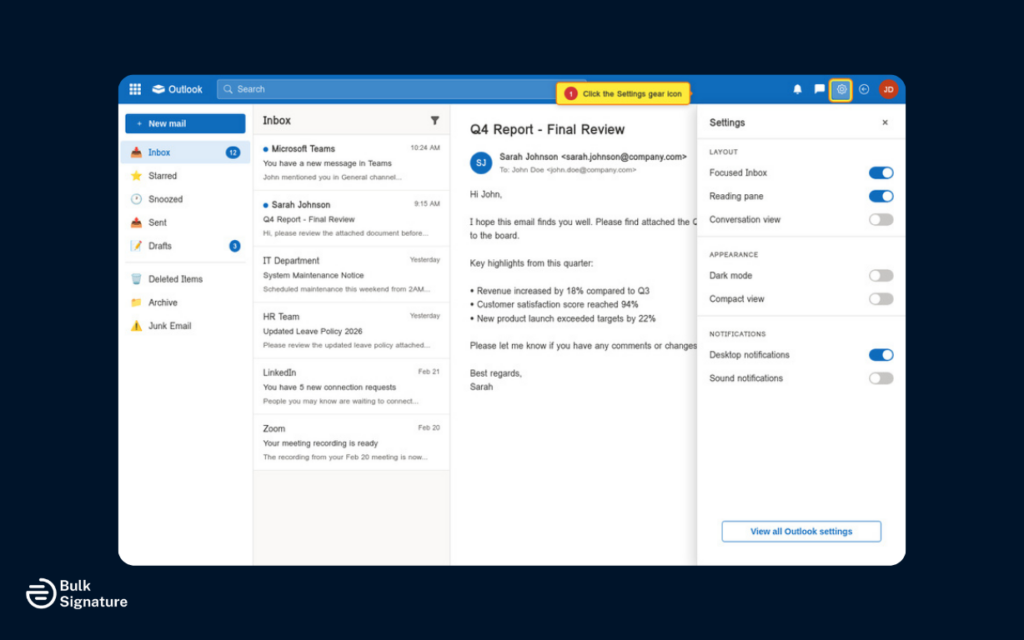
In the settings menu, you may see a quick settings panel. Look for “View all Outlook settings” at the bottom of this panel and click it to access the full settings menu.
Step 2: Navigate to Email Signature Settings
In the full settings menu, click on “Mail” in the left-hand menu, then select “Compose and reply.” This is where you’ll find the email signature tab and signature settings for Outlook on the web.
Step 3: Edit Your Signature
Scroll down to the “Email signature” section. You’ll see a text box where you can type your signature content. If you already have a signature, it should appear in this box, and you can edit it directly.
Use the formatting toolbar above the text box to change fonts, add bold or italic text, create hyperlinks, and insert images. To add your company logo or other images, click the image icon and either upload an image file from your computer or paste a link to an image hosted online.
Step 4: Choose Signature Settings
Below the signature text box, you’ll see options for when to include your signature. You can choose to automatically include your signature on new messages, and you can also choose whether to include it on messages you forward or reply to.
If you manage multiple email accounts in Outlook on the web, you may also see a drop-down menu to select which account the signature applies to. Make sure you’re editing the signature for the correct account before saving your changes. Otherwise, you might update your personal signature when you meant to update your work one (and that’s an awkward email you don’t want to send).
Step 5: Save Your Signature
After you’ve made your desired changes, click the “Save” button at the top or bottom of the settings page. Your signature is now saved and will appear in your emails according to the settings you chose.
How to Change Email Signature in Outlook Mobile App
Last but not least: mobile.
The Outlook mobile app for iOS and Android allows you to create and edit a mobile signature on your smartphone or tablet. The mobile signature is typically shorter than a desktop signature, as it’s designed for quick replies on the go.
Step 1: Open Outlook App Settings
To change your email signature, open the Outlook app on your mobile device. Tap on your profile icon or the menu icon (usually three horizontal lines) in the top left corner to open the main menu.
In the menu, look for the settings gear icon, usually located at the bottom left corner of the screen. Tap it to access the Outlook settings.
Step 2: Find Signature Settings
In the settings menu, scroll down until you find the “Signature” option. The exact location may vary slightly depending on your operating system (iOS or Android) and the version of the app you’re using, so you may have to scroll a bit to find it.
From here, tap on “Signature” to open the signature editor.
Step 3: Edit Your Mobile Signature
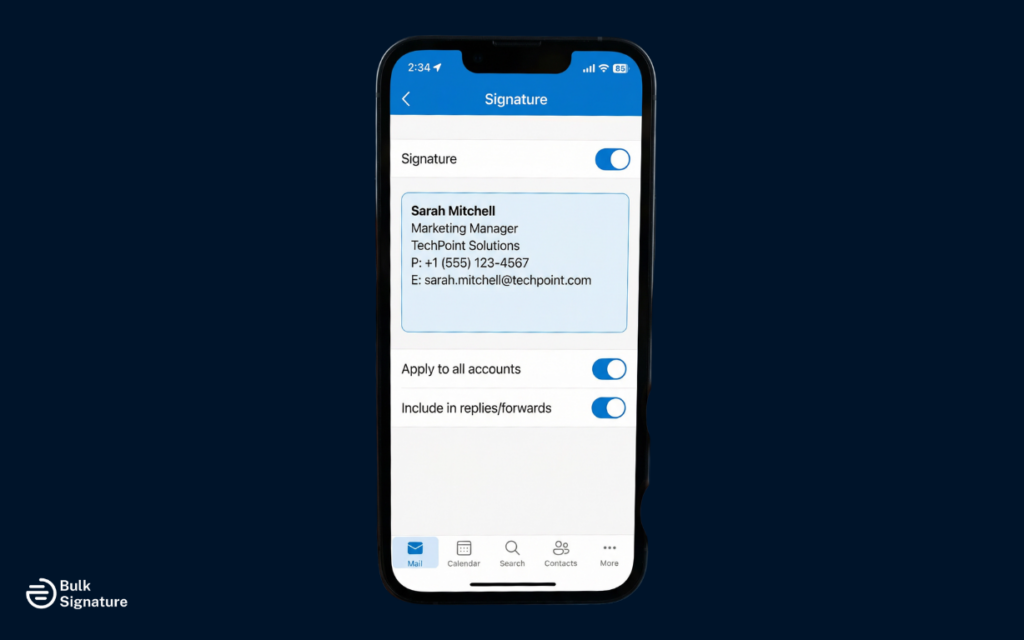
In the signature editor, you’ll see a text box with your current mobile signature. The default mobile signature is often something like “Sent from my iPhone” or “Get Outlook for iOS.”
Delete the default text and type your own signature. It’s important to note here that the mobile signature editor has limited formatting options compared to the desktop and web versions. For example, you typically can’t add images or extensive formatting on mobile.
Pro Tip: Because this is a mobile signature, keep it short and simple. Include only the most essential contact information, such as your name, job title, and phone number, to keep your emails easy to read on smaller screens.
Step 4: Save Your Changes
After you’ve entered your signature text, click “Save” or simply navigate back to the previous screen. Your changes will be saved automatically, and your new mobile signature will appear in emails you send from the Outlook app.
Creating Multiple Signatures for Different Purposes
One of the powerful features of Outlook is the ability to create multiple signatures and choose which one to use for different situations. Here are some common scenarios where multiple signatures are useful.
Different Signatures for Different Email Accounts
If you manage multiple email accounts in Outlook (for example, a work account and a personal account), you can create a separate signature for each account. This allows you to maintain professional branding for work emails while using a more casual signature for personal messages.
In the signature settings, you can specify which signature applies to which email account. When you compose a new message, Outlook will automatically use the appropriate signature based on the account you’re sending from.
Short Signatures for Replies
Many people prefer to use a shorter signature for replies and forwards, since the full signature can feel repetitive in a long email thread. When an email chain stretches to ten messages deep, no one needs to scroll past your logo, social links, and full contact details every single time.
To set this up in Outlook, you can create a brief signature with just your name and title, and set it as your default for replies and forwards.
6 Best Practices for Outlook Email Signatures
Now that you know how to change your Outlook email signature, let’s make sure you’re actually making the most of it. Here are six email signature best practices to bear in mind when updating your signature in Outlook.
Outlook Email Signatures Best Practices
What to Do | Why It Matters | How to Do It |
Keep it concise | Long blocks of text can feel overwhelming and cluttered. | Stick to 4-6 clean lines with only your essential information like your name, title, company, and key contact info. |
Use consistent branding | Your signature is part of your company’s image. Inconsistent fonts, colors, or logos can be confusing and often come across as unprofessional. | Use your official company logo and approved brand colors. Keep fonts simple and professional. |
Make phone numbers clickable | Most people read email on their phones. If they can tap to call you, that’s a win. | Format phone numbers as hyperlinks using the tel: format. |
Test across email clients | What looks perfect in Outlook might look messy in Gmail or Apple Mail. | Send yourself test emails and check them on different devices and apps. |
Avoid large images | Huge logos and images slow down emails, don’t always load properly, and may trigger spam filters. | Compress images and keep them under 50KB. Smaller is always better. |
Update regularly | Nothing says “I haven’t updated this in years” like an old title or phone number. | Review your signature every few months and always update it when your role changes. |
For more inspiration on email signature design, check out the following resources:
Taking Control of Your Email Signature in Outlook for Good
Updating your Outlook signature should only take a few minutes. But between desktop, web, and mobile versions, it can feel like you’re on a wild goose chase just to change one tiny detail.
That’s why so many growing teams move to centralized email signature management.

For example, with tools like BulkSignature, you can control every Outlook signature across your company from one place.
For example:
- Marketing can update banners in minutes.
- Legal can roll out disclaimer changes instantly.
- HR can reflect promotions or rebrands without sending instructions to the whole company.
- Employees don’t have to waste time figuring out how to update their email signature themselves.
That means every email your team sends reflects a consistent, professional standard (and no more chasing employees to update their details).
Ready to simplify Outlook signature management across your entire company? Book a free demo with BulkSignature today to see it in action!


